No HDR Required

I seem to on a roll this week so I’ll stick my neck out again with another over the top proclamation; You don’t need no stinking HDR to obtain a well-balanced exposure! Boom! There it is. Let the flames begin. 😉

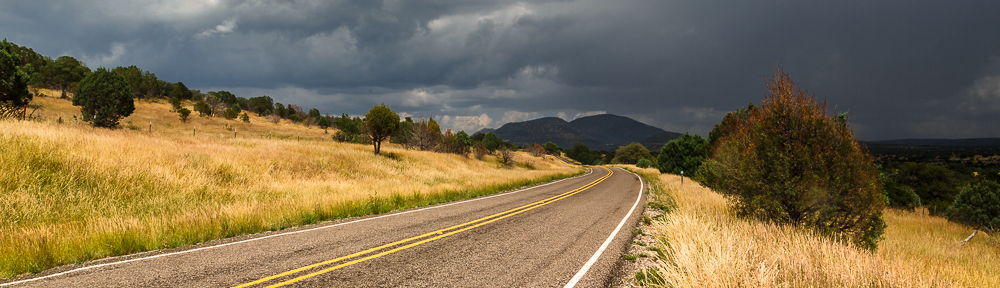
Wow, that was fun. Honestly though, you really can get a well balanced exposure even in bright sunlight. I took this shot last June during an early evening hike in Palo Duro Canyon State Park in the Texas panhandle. I was hiking to find some interesting subjects to shoot later in the evening when I came upon this grouping of rocks framing the canyon rim in the background.

I was facing almost due west and the sun was casting very harsh shadows onto the red dirt. This type of scene is well beyond the dynamic range of any DSLR sensor with the bright sky almost eight stops brighter than the shadows under the rocks. I knew if I had any chance of getting a decent exposure I would have to fool my camera’s light meter and even out the exposure in the scene. Where an HDR expert would take several shots at various exposures and blend them together in Photomatix, I wanted to see if it was possible to do the same “in camera”.

Hiking in Palo Duro Canyon

Hiking in Palo Duro Canyon – Canyon, Texas
Copyright © 2010 Jeff Lynch Photography
Shot taken with a Canon EOS 5D Mark II set on aperture (Av) priority using an EF 17-40mm f/4L USM lens tripod mounted. The exposure was taken at 31mm, f/16 for 1/20th of a second at ISO 100 with a Singh-Ray warming polarizer filter and 2-stop graduated neutral density filter. Post capture processing was done in Adobe’s Lightroom 3.

Click on the image above for a larger version.

View Location on Panoramio & Google Earth: Hiking in Palo Duro Canyon – Canyon, Texas

Incident or Spot Metering
My first step was to grab my Sekonic L-358 and meter the background, the rocks and the shadows to see just how far apart they were in exposure. Your Canon DSLR’s meter can also do this when used in “Partial” or “Spot” metering modes. If you try this in “Evaluative” mode your camera’s meter will most likely blow out the background completely.

Aperture Priority
I set my tripod mounted camera on Aperture (Av) priority at f/16 and took a quick shot using Spot Metering mode with no exposure compensation and no filters. I chose a single focus point in the shadow of the large rock to see how much detail I could capture. As I thought, the shadow detail was fine but the blue sky and white clouds were completely blown out.

Manual
Next I set my camera on Manual (M) with f/16 at 1/10th of a second shutter speed, again with no filters. Now, the blue sky came back a bit but the white clouds were still blown out and the shadows had darkened only a little. Now, we’re cooking!

Filters to the Rescue?
At this point I had pretty decent exposure of the rocks and shadows but the sky was still too bright. So I added a Singh-Ray circular polarizer to my lens and dialed in about half power by rotating the filter slowly until the clouds showed some detail. I also added a 2-stop, soft edge, graduated neutral density filter angled to match the slope of the canyon rim.

I adjusted both filters and my shutter speed until the blue sky darkened and the white clouds barely showed any detail. This resulted in an exposure of 1/20th at f/16 which evened out the light and dark areas in the shot with one exception. Anyone care to guess?

You’ve got it. The top of the large rock was bisected by the graduated ND filter and became much too dark for the image to look realistic. As one of my readers (and a friend I hope) from the Pacific Northwest points out, this is where graduated ND filters fall down on the job.

Finishing Your Image in “Post”
Luckily, this is where a program like Adobe Photoshop or Lightroom really shines. As you can see in the screenshot below, I used Lightroom 3’s “Adjustment Brush” to paint the top half of the large rock to increase the exposure, brightness and contrast until it matched the lower half.

Using Lightroom's Adjustment Brush

Conclusions
Did I cheat to get this shot? That’s up to you to decide. I’m pleased with the results and very pleased that I could do it with 95% “in-camera” techniques and only 5% “post processing” techniques and I did it without resorting to HDR.

Does that mean that I’ll never use HDR techniques in my work? Not at all. Many of my best interior shots were created by blending several exposures together using Photomatix Pro. I may advocate creating images “in camera” but I’m also very pragmatic. I look at software (Lightroom, Photoshop, Photomotix) in the same manner that I look at hardware (camera, lenses, strobes). They are just tools, no different than a typewriter or a monkey wrench. Whatever it takes to get the job done!

Rainy Day Photography – Finding a Subject

Its (still) winter and even here in sunny Texas, many weekends are full of rain and dark clouds. On days like this I’ll usually just sit inside and sort through old images looking for those hidden gems in Lightroom that might make a good post. Other times however, I’ll just have to get out with my camera and look for something to shoot before I go stir crazy.

Shooting during inclement weather doesn’t have to be such a pain, if you follow a few simple rules.

  • Be very careful during thunderstorms because while storm clouds can add excitement to a your images, they can also add too much excitement to your life. Carrying around $2000 worth of electronics in a thunderstorm is not a great idea.
  • A shower cap and clear-glass filter make a very effective yet inexpensive weather-proof cover for your camera.
  • High dynamic range (HDR) processing can really bring out the shadow detail in storm clouds making them appear much more dramatic. It also makes the wet roads come to life.

Sugar Mill Storm

Storm Brewing
Copyright © 2009 Jeff Lynch Photography
Shots taken with a Canon 40D tripod mounted and set on aperture priority (Av), using an EF-S 17-85mm f/4-5.6 IS USM. The three exposure bracketed set was taken at 20mm, f/9.5 at ISO 100 on Sandisk digital film. All post capture processing was done in Lightroom 2 and Photomatix Pro. Click on the image above for a larger version.

Landscape Photography – Prairie Sunset

The bad weather finally broke this weekend and I was able to get out and shoot some sunsets with my EOS 50D. To obtain as much detail as possible I decided to process the first three shots as a Grayscale HDR image in Photomatix Pro. One thing to keep in mind when creating HDR images using high resolution RAW captures such as those created by the 50D, is the size of the resultant HDR file. In this case the three 15 MB raw images create an HDR file over 80 MB in size!

Much of Southeast and Central Texas is prairie. In the spring and summer its a lush green but in the fall and winter months it takes on a unique brown and red glow. In black and white you can see the luster of the tall prairie grass. In the header of my blog you can catch a glimpse of its autumn tones. Nowhere else I’ve lived or travelled can match the beauty and grandeur of a Texas sunset. Its a sight to behold!

Prairie Sunset HDR

Prairie Sunset
Copyright © 2008 Jeff Lynch Photography
Shots taken with a Canon EOS 50D tripod mounted, EF-S 10-22mm f/3.5-4.5 USM at 22mm, f/9.5 at ISO 100 on Lexar Professional (UDMA) digital film. All post capture processing was done in Photomatix Pro 3.1 and Lightroom 2. Click on the image above for a larger version.

Early Texas Architecture

Here’s a shot I took a few months back during my first visit to the Monument Hill and Kreische Brewery State Historic Sites near La Grange, TX. This is the veranda of the Kreische home built with native hill country stone quarried on the property. I love the unique architecture of these early Texas homes. You can see the influence of the early Spanish settlers and the later German immigrants that settled this area in the 1800’s.

The Veranda

The Veranda
Copyright © 2008 Jeff Lynch Photography
Shots taken with a Canon 40D hand-held, EF-S 17-85mm f/4-5.6 IS USM at 20mm, f/13 at ISO 200 on SanDisk digital film. The HDR file was made from three RAW images tone-mapped in Photomatix Pro. All other post capture processing was done in Lightroom 2 and Noise Ninja. Click on the image above for a larger version.

Two Views

I’ve really fallen in love with the incredible detail that results from tonemapping a multi-exposure HDR image. The two images shown here were created by merging seven different exposures that were taken using the techniques that John O’Connor explains in his Raindrops and Ferns-HDR post. The first image was converted to grayscale after tonemapping and the second was processed “normally” in Lightroom 2.

Shelter

Shelter B&W
Copyright © 2008 Jeff Lynch Photography
Shots taken with a Canon 40D tripod mounted, EF-S 10-22mm f/3.5-4.5 USM at 10mm, f/11 at ISO 100 on SanDisk digital film. The HDR file was made from seven RAW images tone-mapped in Photomatix Pro. It was converted to grayscale in Lightroom 2 and finished in Noise Ninja. Click on the image above for a larger version.

Shelter

Shelter
Copyright © 2008 Jeff Lynch Photography
Shots taken with a Canon 40D tripod mounted, EF-S 10-22mm f/3.5-4.5 USM at 10mm, f/11 at ISO 100 on SanDisk digital film. The HDR file was made from seven RAW images tone-mapped in Photomatix Pro. All other post capture processing was done in Lightroom 2 and Noise Ninja. Click on the image above for a larger version.

In the past few months of playing around with high dynamic range processing I’ve found that the secret to obtaining a really detailed HDR image is in eliminating any camera or subject movement “during and between each exposure”. This can be accomplished using the techniques that John explains or by using the High Speed HDR technique popularized by Uwe Steinmueller.

I’ve also found that (for me) Photomatix Pro 3.1 gives me the most realistic looking results and the lowest noise in my images. One final thing to remember is that almost every tonemapped image still needs some final “tweaking” in Lightroom or Photoshop to obtain the best results.

What Else Will That Lens Do?

efs10-22I think I’m on a roll here so I’m gonna keep going.

One of the other neat little things that the Canon EF-S 10-22mm f/3.5-4.5 USM lens excels at is wide-angle high dynamic range photography. I believe the keys to a really cool HDR image are good color depth and incredible detail and this lens performs very well on both fronts.

I took this series of three images (shown here as a finished HDR image) at both the minimum focusing distance (about 10 inches) and the widest focal length (10mm) for this zoom. If you click on the image below you can see the incredible detail in the texture of the wood and rocks captured by this lens.

Enjoy!

Lookout Shelter HDR

Wide-Angle HDR
Copyright © 2008 Jeff Lynch Photography
Shots taken with a Canon 40D tripod mounted, EF-S 10-22mm f/3.5-4.5 USM at 10mm, f/13 at ISO 100 on SanDisk digital film. The HDR file was made from three RAW images tone-mapped in Photomatix Pro. All other post capture processing was done in Lightroom 2 and Noise Ninja. Click on the image above for a larger version.

Really, Really Wide

efs10-22If you’ve read yesterday’s post about the Canon EF-S 10-22mm f/3.5-4.5 USM lens the question you’re probably asking yourself is just how wide does that lens really go?

Here’s a pretty good example from Monday’s visit to the Monument Hill State Historic Site. I took this shot (series of three shots converted into an HDR file) with my 40D tripod mounted and the lens at 10mm without a circular polarizer. Yes, that’s correct. NO circular polarizer!

To give you a better idea of just how much detail this lens captures, the tree just to my left was less than 3 feet away from me. The Colorado river seen in the center of the image is about 2 miles away and the bridge you see in the distance is over 6 miles away (as the crow flies).

If you click on the image below and look left of center above the horizon you can also make out the faint outline of the moon.

Not too bad for a “consumer grade” lens!

Really Really Wide

Really, Really Wide
Copyright © 2008 Jeff Lynch Photography
Shots taken with a Canon 40D tripod mounted, EF-S 10-22mm f/3.5-4.5 USM at 10mm, f/13 at ISO 100 on SanDisk digital film. The HDR file was made from three RAW images tone-mapped in Photomatix Pro. All other post capture processing was done in Lightroom 2 and Noise Ninja. Click on the image above for a larger version.

Walking Through The Hill Country

The Texas Hill Country is one of the most unique and beautiful areas I’ve ever seen. Hiking through this area on a quiet fall afternoon is one of the simple pleasures that make living in Texas so wonderful. I took these two shots a few weeks ago when the colors were just beginning to change. I’ll be back on Monday hoping to capture the warmth and beauty of an autumn day in the Texas Hill Country.

Hill Country Trail

Hill Country Trail
Copyright © 2008 Jeff Lynch Photography
Shots taken with a Canon 40D hand-held, EF-S 17-85mm f/4-5.6 IS USM at 22mm, f/19 at ISO 200 on SanDisk digital film. The HDR file was made from three RAW images tone-mapped in Photomatix Pro. All other post capture processing was done in Lightroom 2 and Noise Ninja. Click on the image above for a larger version.

Up Hill Climb

Up Hill Climb
Copyright © 2008 Jeff Lynch Photography
Shots taken with a Canon 40D hand-held, EF-S 17-85mm f/4-5.6 IS USM at 17mm, f/19 at ISO 200 on SanDisk digital film. The HDR file was made from three RAW images tone-mapped in Photomatix Pro. All other post capture processing was done in Lightroom 2 and Noise Ninja. Click on the image above for a larger version.