Landscape Photography – More Rocks, Trees and Water

Here’s another image taken from a slightly different vantage point, namely in the middle of Onion Creek at the McKinney Falls State Park in Austin, Texas. The water level was so low in this area I was able to climb, jump and slip from rock to rock until I found myself right smack dab in the middle. Makes for an interesting perspective and one that will be impossible to duplicate once the rains come again (he says prayerfully).

More Rocks and Water

More Rocks and Water
Copyright © 2009 Jeff Lynch Photography
Shot taken with a Canon EOS 50D set on aperture priority (Av) using an EF 24-105mm f/4 L IS USM tripod-mounted. The exposure was taken at 24mm, f/22 for 1/8th of a second at ISO 100 on Lexar Professional digital film. Post capture processing was done entirely in Lightroom 2. Click on the image above for a larger version.

Landscape Photography – Rocks and Water

Even though I didn’t get to play around much with my Singh-Ray Vari-ND filter last weekend, I was able to capture a few nice exposures of Onion Creek at the McKinney Falls State Park. One nice thing about the very low water level was the opportunity to photograph some wonderful rock formations that are usually below the water line.

Rocks and Water

Rocks and Water
Copyright © 2009 Jeff Lynch Photography
Shot taken with a Canon EOS 50D set on aperture priority (Av) using an EF 24-105mm f/4 L IS USM tripod-mounted. The exposure was taken at 24mm, f/18 for 1/15th of a second at ISO 100 on Lexar Professional digital film. Post capture processing was done entirely in Lightroom 2. Click on the image above for a larger version.

Landscape Photography – My Kingdom for Some Rain

I traveled to Austin, Texas last Friday to capture some stunning shots of the upper and lower falls at the McKinney Falls State Park. I called the park well in advance to ask just how much water flow they were getting over the falls and was told “Oh, it’s flowing pretty well this week”.

Hmmmm… I suppose next time I’ll need to be a little bit more specific with my questions.

McKinney Upper Falls

McKinney Upper Falls – Bone Dry
Copyright © 2009 Jeff Lynch Photography
Shot taken with a Canon EOS 50D set on aperture priority (Av) using an EF 24-105mm f/4 L IS USM tripod-mounted. The exposure was taken at 28mm, f/11 for 1/30th of a second at ISO 100 on Lexar Professional digital film. Post capture processing was done entirely in Lightroom 2. Click on the image above for a larger version.

Landscape Photography – Those Texas Clouds

Here’s another shot taken in the Texas Hill Country showing those wonderful clouds. We don’t get many spring days nicer than this!

Those Texas Clouds

Those Texas Clouds
Copyright © 2009 Jeff Lynch Photography
Shot taken with a Canon EOS 50D set on aperture priority (Av) using an EF-S 10-22mm f/3.5-4.5 USM tripod-mounted. The exposure was taken at 12mm, f/18 for 1/80th of a second at ISO 100 on Lexar Professional digital film. Post capture processing was done in Lightroom 2. Click on the image above for a larger version.
 
The image above was taken using a 3-Stop/Soft rectangular Singh-Ray Graduated Neutral Density Filter held in place in front of the lens using a Cokin “P” Series Filter Holder.

If you’re really interested in some incredible cloud shots take a look at Laurie Excell’s latest “Storm Chase Safari” posts. Laurie’s an incredible photographer and a real adventurer at heart. You’ll never catch me driving that close to a tornado!

Storm Chase Safari Day 1…Positioning Day

Storm Chase Safari Day 2

Storm Chase Safari Day 3

Storm Chase Safari Day 4

Landscape Photography – Let’s Talk Filters

If there’s one topic in photography that’s bound to stir up a heated debate it’s the selection and use of filters. No other accessory that I can think of does more to raise the blood pressure of otherwise sedate amateur and professional photographers.

For as long as I can remember there has been an ongoing debate over the use of UV filters for lens protection. The proponents say that UV filters offer good protection for the front lens element while their opponents say that a lens hood provides all the protection needed and that any piece of glass placed in front of the lens will degrade image quality.
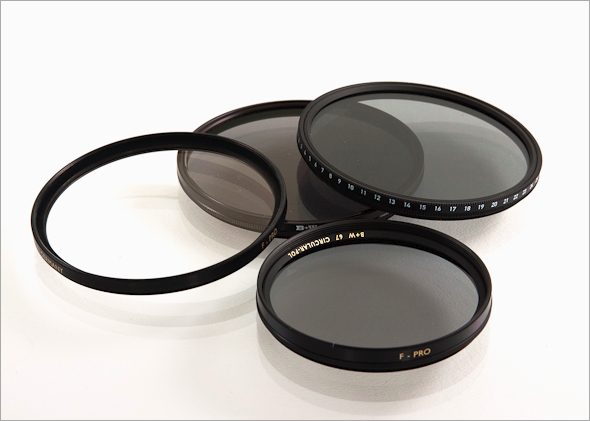
Filters

In my opinion both sides are right and both sides are wrong. While I agree completely that any filter placed in front of the lens will degrade the image somewhat, I believe the amount of degradation depends upon the type and quality of the filter used. And there is no doubt that the UV filter does, in fact, add extra protection for the front lens element. So the question is, what kind of UV filter will provide the least possible image degradation and how much will it cost?

You can find many different brands of filters today but in my opinion, the quality and performance of B+W MRC and Heliopan SH-PMC filters make them my number one choice. Both companies use anodized brass rings to reduce thread binding and special multi-layer coatings to prevents light from being reflected off the surface of the filter.

Another favorite of mine is Singh-Ray, possibly the best filter manufacturer in the world. Singh-Ray filters are almost legendary among professional landscape photographers, with superb quality and innovative designs. Having used their filters for years all I can say is wow!

My final thoughts on filters are about cost. No matter which type of filter you decide  you need (UV, Circular Polarizer, Neutral Density, ND Grad, etc.), you’re gonna lay down over $100 (USD) for a good quality filter. The very best can run you anywhere from $150 – $300 (USD) depending upon the size. You’ve already spent several thousand dollars on a camera body and a few lenses (or perhaps more than a few). Why place a $40 el-cheapo filter in front of that investment in top-notch gear and ruin your chances at capturing a great image? The man who taught me this craft  over 30 years ago you to put it this way “buy the very best gear you can afford and buy it only once!”.

Sound advice in any day and age!

Landscape Photography – Big Sky Country

I trust everyone had a nice Memorial Day weekend. Here is another shot taken last Friday from the Monument Hill State Historical Site near La Grange, Texas. With a sky this big it’s hard to take a bad shot!

Big Sky Country

Big Sky Country
Copyright © 2009 Jeff Lynch Photography
Shot taken with a Canon EOS 50D set on aperture priority (Av) using an EF-S 10-22mm f/3.5-4.5 USM tripod-mounted. The exposure was taken at 16mm, f/18 for 1/800th of a second at ISO 100 on Lexar Professional digital film. Post capture processing was done in Lightroom 2 using Nik Software’s Dfine, Sharpener Pro and Viveza filters. Click on the image above for a larger version.
 
The image above was taken using a 3-Stop/Soft rectangular Singh-Ray Graduated Neutral Density Filter held in place in front of the lens using a Cokin “P” Series Filter Holder.

Landscape Photography – Using the ND Grad Filter

When photographing landscapes it’s often difficult to capture enough detail and color saturation in the bright sky and in areas along the horizon while also exposing the foreground properly. You could capture a series of bracketed exposures and process them as an HDR image as I’ve done before or you can turn to a simple and extremely effective tool such as the graduated neutral density filter.

The graduated neutral density filter is one of the most important tools in a landscape photographer’s kit. No other filter (including the circular polarizer) will have such an impact on a landscape image and believe me, this trick has been around almost as long as photography itself.

The image below was taken using a 3-Stop/Soft rectangular Singh-Ray Graduated Neutral Density Filter held in place in front of the lens using a Cokin “P” Series Filter Holder. No lightening or darkening was performed during post capture processing. This is exactly what I saw looking through he viewfinder. The clouds were bright, the sky was a beautiful blue and the trees in the foreground were exposed perfectly.

I strongly recommend this type of ND Grad filter and holder since it allows you to control exactly where the effect begins and ends. Conventional (round) graduated neutral density filters set the ND effect to begin directly in the middle of the image and very few well composed landscape images have the horizon right in the middle.

Moument Hill Clouds

Monument Hill Clouds
Copyright © 2009 Jeff Lynch Photography
Shot taken with a Canon EOS 50D set on aperture priority (Av) using an EF-S 10-22mm f/3.5-4.5 USM tripod-mounted. The exposure was taken at 15mm, f/14 for 1/100th of a second at ISO 100 on Lexar Professional digital film. Post capture processing was done in Lightroom 2 using Nik Software’s Dfine, Sharpener Pro and Viveza filters. Click on the image above for a larger version.

My RAW Workflow Explained

I’m taking today off work and heading to Austin, Texas to visit the McKinney Falls State Park, Bastrop State Park and Buescher State Park. McKinney Falls is the only waterfalls within 200 miles of Sugar Land, Texas and I’m finally going to have the opportunity to use my Singh-Ray Vari-ND filter to hopefully create some nice images of flowing water. Given the lack of rain we’ve been experiencing the past few years, this wonderful neutral density filter has been gathering dust (figuratively speaking) on my shelf for much too long. Wish me luck!

Seeing that Nik Software has recently made all their plug-in filters compatible with Lightroom, I thought I’d run through my updated workflow to give you an idea of how I process most of my RAW images these days.

Nik Software for Lightroom

This image illustrates how I use the Nik Software products to enhance my images and reduce the amount of time spent in post capture processing.

  • I begin by cropping the image in Lightroom and applying some basic settings in the “Develop” module to correct the white balance, increase the contrast and touch up any spots on my image.
  • Next I export the image to Dfine 2.0 where I analyze and correct any noise present in my image. Dfine does an excellent job of reducing noise without reducing image sharpness and makes it easy to apply the noise reduction only to those areas that need it.
  • Next I export the image to Sharpener Pro 3.0 using the RAW Presharpener settings to selectively sharpen some areas before processing further. This RAW Presharpening is very subtle to detect.
  • Next I export the image to Viveza to selectively enhance the image’s contrast, saturation, warmth, etc. If I do nothing else to an image, Viveza is the one tool that I almost always use.
  • If needed, I next export the image to Color Efex Pro 3.0 or Silver Efex Pro depending upon what effect I’m trying to produce. Both programs contain a wide variety of color or black & white presets to help you obtain just the right look.
  • Finally I export the image to Sharpener Pro 3.0 and apply the required output sharpening, either for print or web. I generally dial down the intensity of this final sharpening to prevent the creation of noise or JPEG artifiacts.
  • Then I export the image from Lightroom in whatever format I need.