 If you haven’t read David duChemin’s latest book Vision & Voice: Refining Your Vision in Adobe Photoshop Lightroom then you’re missing out on what’s possibly the best overall “guide” to using Adobe Lightroom ever written. Like all of David’s books, it’s written for photographers (right-brain) not computer geeks (left-brain).
If you want to explore the minutia of sharpening, color spaces, key-wording, bla, bla, bla then find another book. But if you want concrete examples from start to finish of how and (more importantly) why David processes his images, then buy this book now!
The Making of Camelot
I took this shot several weeks ago during a trip to the Texas panhandle. I had seen this Tule Canyon butte featured in Wyman Meinzer’s 2001 book Canyons of the Texas High Plains and was captivated by its resemblance to a medieval castle. I also wanted to find an image that I could use to practice some of David’s post-capture magic.
Step 1: Zeroed
Every few months I’ll get an email or comment asking me what my “raw” image looked like before I began “developing” it in Lightroom. I get this question a lot from folks that live up north where the sun doesn’t shine quite as brightly as it does here in Texas. The assumption is that I’ve somehow “cheated” to make the image look better than it did in real life.

So for those of you that “knew” I was cheating all along, here is the proof! A raw file exported to a JPEG using Lightroom 3’s “Zeroed” preset. No added contrast, vibrance, clarity, luminance, exposure, brightness, fill light, black point, blah, blah, blah. A dull, lifeless, underexposed raw file.
The only trouble is, this image doesn’t look anything like what I remember seeing.
Step 2: Normalized
So while David prefers to start out with a “zeroed” file, I most often begin with Lightroom 3’s default settings which include brightness & contrast as well as applying a medium contrast tone curve using whatever white balance you took the shot at.

Now, this is much closer to what I remember.
Step 3: Camera Calibration
Strangely enough I now begin by working “up” the panels in Lightroom 3’s Develop Module. Nine times out of ten, I’ll use the “Camera Standard” (Canon 5D Mark II) profile for my landscape images because it tends to deepen the earth tones and adds contrast to the blue sky.

Camera Calibration in Lightroom 3
Step 4: Lens Corrections
Next I use the new Lens Corrections settings and check the Enable Profile Corrections box which fixes any barrel or pincushion distortion, chromatic aberration and vignetting problems inherent in my Canon EF 17-40mm f/4L USM lens. This is similar to what the well respected PTLens plugin from Tom Niemann does in Photoshop, although the effect in Lightroom 3 is more subtle.

Lens Corrections in Lightroom 3
Step 5: Basic Settings
My next step is to adjust the Basic settings such as White Balance (usually set for Daylight depending upon the image), Clarity (which adds some wonderful mid-tone contrast) and Vibrance (which is more subtle than adding saturation).
I generally adjust the White Balance to somewhere between 5000K and 5500K in Lightroom to make the images match what I remember seeing. This is a key step in creating the mood you want in the image.

Basic Setting in Lightroom 3
At this point in my workflow, I’ll also adjust the Exposure, Recovery, Brightness and Contrast settings until I find the right exposure balance (lights and darks) and tone (color gradations) for the image. I may spend as little as ten minutes or as much as several hours trying different combinations until I achieve the look and feel I want.
Step 6: Tone Curve
Next I generally adjust the Tone Curve by setting the Point Curve to Medium Contrast which adds some much contrast to the entire image. Notice how I’ve set my “Shadows” slider to bring back some detail in the deep shadows on the right side of the butte.
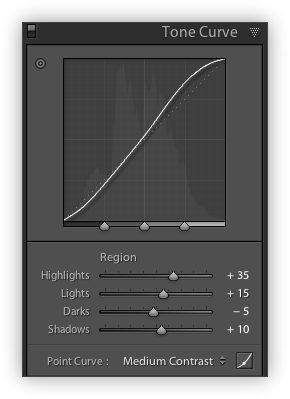
Tone Curve in Lightroom 3
Note: It’s important to remember Ansel Adams’ Zone System. To make a scene look realistic you need some bright whites and pure blacks in the shade, so a little “clipping” in the histogram is perfectly acceptable.
Step 7: Luminance
My final “tweaks” to the image are done by adjusting the Luminance settings. This is where my fine tuning is done to create drama in my images. I’ll generally reduce the Aqua and Blue color values to darken the sky and make the clouds stand out more. I’ll also increase the Green and Yellow luminance values to enhance the color of the foliage.
Note: I’ve found nothing in Lightroom 3 that works half as well as a circular polarizer does in the field to enhance contrast and add saturation to an image. Just something to think about.

Luminance Settings in Lightroom 3
Small, incremental changes go a long way here, so I’m careful not to push things too far and end up with an image that looks unrealistic. I have enough trouble with folks that don’t live in Texas believing that our skies are actually this blue and our clouds this white.
Step 8: Repeat as Necessary
When using Lightroom’s Develop Module to create your personal VDW (Vision Driven Workflow) the Virtual Copy is your best friend. The undo history is a great feature but nothing beats creating a Virtual Copy at key points in your workflow. Once you’ve made these copies, you are free to experiment to your heart’s content with no fear of finding your way back from a creative dead-end in Lightroom.
The Results
I wanted to create an image that you might imagine seeing on a hot summer afternoon in jolly old England, looking up at the grandeur of Camelot. Let your mind wander and suspend your disbelief for a moment. Gaze up at the battlements atop the towers of the castle.
I can almost here Richard Harris singing . . .
Where once it never rained till after sundown,
By eight a.m. the morning fog had flown…
Don’t let it be forgot
That once there was a spot
For one brief shining moment that was known
As Camelot.
Now, this is how I remember the scene looking.

Camelot – Silverton, Texas
Copyright © 2010 Jeff Lynch Photography
Shot taken with a Canon EOS 5D Mark II set on aperture (Av) priority using an EF 17-40mm f/4L USM lens tripod mounted. The exposure was taken at 22mm, f/16 for 1/25th of a second at ISO 100 with a Singh-Ray warming polarizer filter. Post capture processing was done in Adobe’s Lightroom 3.
Click on the image above for a larger version.
View Location on Panoramio & Google Earth: Camelot – Silverton, Texas


 Here’s a bit of advice for you summer couch potatoes. Grab your keys, your kids and your car this Saturday and head on out to
