Nature Photography – Little Blue Heron

Every once in a while you get really lucky!

The sun was setting over my shoulder leaving the trail mostly in shandow. I was just about ready to pack in my long lens and drive to another part of the park to setup for a few sunset shots when this Little Blue Heron flew right by and landed on the wooden rail not twenty feet in front of me. The sun reflecting off the trees and water backlit this beautiful bird perfectly and all I needed to do was focus on its chest and meter on the dark blue feathers to bring out the shadow detail. Sweet!

Little Blue Heron

Little Blue Heron
Copyright © 2009 Jeff Lynch Photography
Shot taken with a Canon 50D set on aperture priority (Av), using an EF 300mm f/4L IS USM with an EF 1.4X II extender mono-pod mounted. The exposure was taken at 420mm, f/5.6 for 1/90th of a second at ISO 100 on Lexar Professional UDMA digital film. All post capture processing was done in Lightroom 2 using Nik Software’s Color Efex Pro plug-in. Click on the image above for a larger version.

Quick Tip Wednesday – Use a Gray Card

How many times have you been shooting nature or wildlife images where the colors look great on your camera’s LCD but seem a little off in Lightroom? You can spend hours tweaking the white balance and HSL sliders in Lightroom’s develop module trying to get your on-screen image to look like you remember it or you can buy a WhiBal gray card from the folks at RawWorkflow.com and solve this problem in just a few seconds.

Using a Gray Card

Fixing your white balance in Lightroom using a WhiBal gray card is as simple as clicking the White Balance Selector tool (eye-dropper) in the “Basic” panel of the “Develop Module” and then clicking on the neutral gray area of the WhiBal gray card in your image. The Temp and Tint sliders in the Basic panel will adjust to make the selected color neutral, resulting in the correct white balance for these lighting conditions. The final step is to “sync” the white balance for all the other images taken in the same lighting conditions.

Nature Photography – Sunshine

Very few flowers look their best in bright sunshine but every once in a while one does. Here’s a shot I took a few weeks ago at the Mercer Arboretum in Houston, Texas during one of the few sunny periods of that dreary spring day.

Sunshine

Sunshine
Copyright © 2009 Jeff Lynch Photography
Shot taken with a Canon EOS 50D set on aperture priority (Av) using an EF 24-105mm f/4L IS USM hand-held. The exposure was taken at 105mm, f/8 for 1/90th of a second at ISO 100 on Lexar Professional digital film. Post capture processing was done in Lightroom 2 using Nik Software’s Color Efex Pro plug-in for Lightroom. Click on the image above for a larger version.

Product Photography – Pair of Aces

I spent most of the weekend setting up and trying different lighting schemes for some of the small products I’ll be shooting in the next few weeks. Even something as seemingly simple as shooting a “still life” in a studio takes more gear than you’d think at first glance, especially if you want the images to “pop”.

One piece of gear thats become essential when shooting with small strobes is the Justin Clamp or the 175F Bogen – Manfrotto Spring Grip Clamp with Attached Flash Shoe if you prefer. Designed by Joe McNally and Bogen’s Justin Staley, its become the de-facto standard for mounting a hot-shoe flash in a studio or on location. Although not an inexpensive item at a little over $50, it sure beats using gaffer tape to position your flashes in unusual places during a shoot. For my products shots I used it as an inexpensive boom to position the main light source above and and slightly in front of the products being photographed.

Pair of Aces

Pair of Aces
Copyright © 2009 Jeff Lynch Photography
Shot taken with a Canon EOS 50D set on aperture priority (Av) using an EF 24-105mm f/4L IS USM tripod mounted. The exposure was taken at 32mm, f/16 for 0.7 seconds at ISO 100 on Lexar Professional digital film. Post capture processing was done in Lightroom 2 using Nik Software’s Viveza. Click on the image above for a larger version.

The lighting setup for this shot was fairly simple using a Lastolite Cubelite and two Canon 580EX II Speedlites. One 580EX II Speedlite was positioned above and and slightly in front of the subject and the other was positioned to the right. A single reflector directly left of the subject was used to add fill where needed. All exposure ratio magic was done wirelessly using Canon’s E-TTL II sorcery. Later this week I’ll post more about this with photos of the actual setup and the flash settings used.

Nature Photography – Contrast

Here is another shot taken last month at the Mercer Arboretum in Houston, Texas. I really love the wonderful contrast you can find in nature. The different shades of color. The bright highlights and the deep shadows. With a subject this beautiful its hard not to get a nice shot.

Have a great weekend!

Contrast

Contrast
Copyright © 2009 Jeff Lynch Photography
Shot taken with a Canon EOS 50D set on aperture priority (Av) using an EF 24-105mm f/4L IS USM hand-held. The exposure was taken at 105mm, f/4.5 for 1/125th of a second at ISO 100 on Lexar Professional digital film. Post capture processing was done in Lightroom 2 using Nik Software’s Viveza plug-in for Lightroom. Click on the image above for a larger version.

Late Friday Link – JerseyStyle Photography

I had a few minutes this late Friday afternoon and decided to catch up on my blog reading before heading home for the weekend. I just had to post this image taken by a friend and fellow blogger, Mark Krajnak from his JerseyStyle Photography blog. This image and the others in his post Rabble Rousers of New Jersey are simply stunning and really capture the spirit of early America.

I’m sure you’ll agree.

Have a great weekend!

Nature Photography – Green Heron

Here’s a shot I took a few weeks ago. The Green Heron is one of the most colorful small birds I’ve ever seen. They are also great subjects and will stand perfectly still in the sun for 30 – 40 minutes at a time. I don’t generally get the same opportunities from their larger cousin the Great Blue Heron.

Green Heron

Green Heron
Copyright © 2009 Jeff Lynch Photography
Shot taken with a Canon 50D set on aperture priority (Av), using an EF 300mm f/4L IS USM with an EF 1.4X II extender mono-pod mounted. The exposure was taken at 420mm, f/5.6 for 1/180th of a second at ISO 100 on Lexar Professional UDMA digital film. All post capture processing was done in Lightroom 2. Click on the image above for a larger version.

Shooting Tethered with the Canon 50D and Lightroom

One of the best things about working in a studio is the ability to shoot tethered from your DSLR to your computer running Adobe Lightroom. The is especially nice for Canon shooters since all the software you need is included with your camera for FREE!

I guess this almost makes up for (NOT) Canon’s lack of a cost effective GPS solution like Nikon’s GP-1 unit recently covered in a great little post by Jeff Revell. Yes Jeff, Canon shooters are green with envy over this one!

Tethered shooting from the EOS 50D to Lightroom is fairly straight-forward but there are a few tricks to getting things configured correctly. First you start the EOS Utility and set your Preferences as shown below.

EOS Utility

I recommend checking “Auto power off” in the  “Basic Settings” preferences to save your camera batteries. Shooting in a studio using small strobes tends to take a lot longer and you’ll go through camera batteries fairly quickly if you don’t use AC power.

Basic Settings

You can choose a destination folder anywhere on your MacBook but I like to store all images in my “Pictures” folder. One important thing to note is that THIS FOLDER MUST BE COMPLETELY EMPTY (no sub-folders or files) and I’ll explain why later in this article, so keep reading.

NO SUB-FOLDERS (sorry for yelling but it took me almost an hour to figure this out on my own).

Destination Folder

Its also important that your file naming scheme doe not duplicate any file names previously used or Lightroom won’t import these files automatically. Another little issue that took a lot of time to track down.

I use a specific file naming scheme for my work as shown below:

IMG – Image prefix
50D – Camera Model
T – Tethered
000x – File sequence
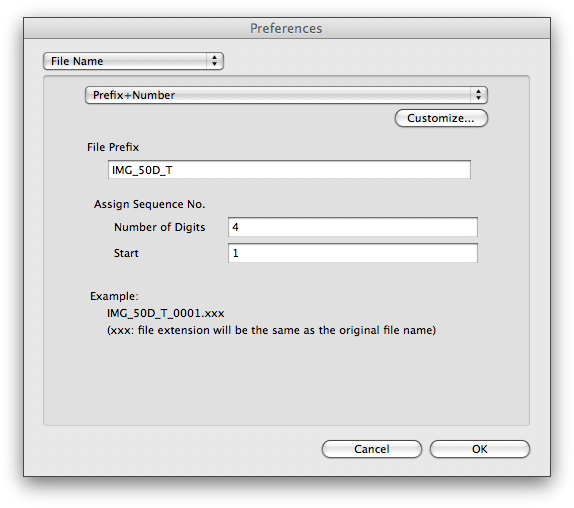
File Naming

And because I’m completely paranoid about losing my work I also write the image files to the compact flash card in the camera. Not strictly necessary but a good studio habit to adopt.

Write Files to Compact Flash

Believe it or not, you really need to set the “Linked Software” preference to “None” for this whole system to work correctly with Lightroom.

Linked Software

To complete this process, just click on the “OK” button to save your preferences and return to the EOS Utility’s main menu.

Now all you need to do is set a few options in Lightroom 2 and you’re ready to begin shooting. Go ahead and start up Lightroom and click on the “Auto Import Settings” menu. Set the “Watched Folder” by clicking on the “Choose…” button and navigating to the “Destination Folder” location you set in the EOS Utility’s preferences.

If this folder is completely empty (as it should be if you read my rant above) then everything will be fine. If not, a nasty little dialog box will pop up telling you the folder must be empty (see, I told you so).

Go ahead and select a “Destination”, a “File Naming” scheme and other “Information” settings and click “OK” to save these Lightroom settings.

Lightroom's Auto Import Preferences

To enable the watched folder all you need to do is select “Auto Import” from the File menu and then select “Enable Auto Import”. Nothing could be simpler, right?

Lightroom's Auto Import

Now, with Lightroom active, select “Camera Settings / Remote Shooting” from the EOS Utility’s main menu.

EOS Utility

And up pops the Camera Control window where you will spend the next several hours, days or weeks happily shooting with your EOS 50D tethered to Lightroom. The really cool thing about this is that the remote shooting controls are so easy to use you could actually “drive” your entire studio session from here. The remote controls are the real thing and you can change almost every camera setting remotely. If you’re doing still life or product photography, the only time you’ll need to look through the viewfinder is to check focus and composition.

Sweet!

Camera Control

So what’s the big advantage to shooting tethered? Well, it sure beats looking at the camera’s 3″ LCD.

BTW – This can also be done wirelessly using Canon’s $800 WFT-E3A Wireless File Transmitter. Now if I could only get my daughters to buy me one for Fathers Day!

My Desktop

CLASS DISMISSED