A Little Perspective (Again)

It’s raining here in Texas again so I thought I’d repost a short article from another, much wetter year just to get in the mood. 🙂

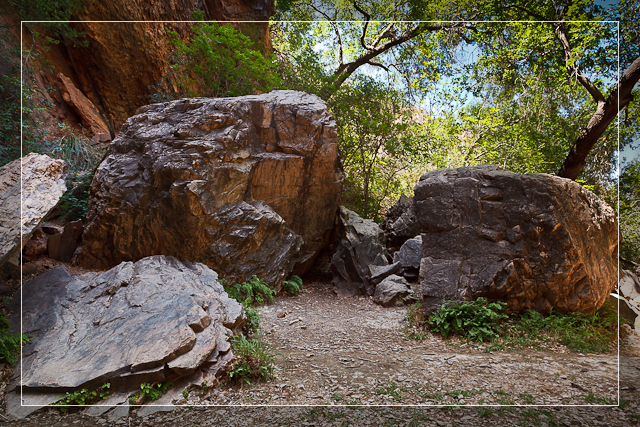
Sometimes it’s a little tough expressing relative size in a photograph. After all, it’s only a two dimensional representation of a three-dimensional subject. In landscape photography this can be especially difficult since the camera tends to “compress” the image perspective somewhat.

Runoff

Runoff – Austin, Texas
Copyright © 2010 Jeff Lynch Photography
Shot taken with a Canon EOS 5D Mark II set on manual (M) using an EF 70-200mm f/4L IS USM lens tripod-mounted. The exposure was taken at 85mm, f/22 for 1/13th of a second at ISO 50. All post capture processing was done in Adobe’s Lightroom 3 Beta. Click on the image above for a larger version.

Take the shot above for example. Can you tell how large the waterfalls and surrounding rocks really are? Can you tell how close they are to you? Me neither! Which is why it’s always a good idea to add some visual clue to your landscape images to help viewers judge the size of your subject and distance the subject is from the viewer. In some cases a simple foreground object can be used to add this sense of “perspective”. In others it’s simply best to add people in your landscape images as shown below. There’s nothing better to add a sense of relative size than having a person in your shot.

(And yes, those folks were mighty close to the slippery edge out there. You should have seen me & my tripod :-))

Perspective

Milestone

Million Views
Who would have thought just a few short years ago that a relatively unknown landscape photographer from Texas could inspire folks to visit his blog over 1,000,000 times?

Certainly not me and I’m suitably humbled and awed that y’all enjoy my images of Texas as much as I do. I’ve published over 850 posts and displayed over 2000 images from around this great state. I’ve enjoyed reading over 4500 comments and NOT reading over 12,500 pieces of spam.

I’ve made some great friends through this blog and gotten to know hundreds of folks I would have never known if not for the power of WordPress and Twitter. I’ve expanded my commercial photography business into markets I’d never imagined just a few short years ago and shared my love of the Texas landscape with dozens of folks that traveled here for the Texas Landscape Safari.

But most of all, I’ve learned more about myself, my profession and my craft than I ever thought possible. All through the daily interaction with folks like you that visit here for just a few minutes of enjoyment and inspiration.

YOU are the reason I write, share and display my vision of the great state of Texas and from the bottom of my heart, I thank you all.

— Jeff

Big Bend’s Secret Garden

Enjoy!

Secret Garden

Secret Garden – Big Bend National Park, Texas
Copyright © 2011 Jeff Lynch Photography
Shot taken with a Canon EOS 5D Mark II set on aperture (Av) priority using an EF 24-105mm f/4L IS USM lens tripod mounted. The exposure was taken at 24mm, f/16 for 8/10th of a second at ISO 100 using a Singh-Ray warming polarizer filter. Post capture processing was done in Adobe’s Lightroom 3.
Click on the image above for a larger version.

Spring Pool

Spring Pool – Big Bend National Park, Texas
Copyright © 2011 Jeff Lynch Photography
Shot taken with a Canon EOS 5D Mark II set on aperture (Av) priority using an EF 24-105mm f/4L IS USM lens tripod mounted. The exposure was taken at 40mm, f/14 for 3/10th of a second at ISO 100 using a Singh-Ray warming polarizer filter. Post capture processing was done in Adobe’s Lightroom 3.
Click on the image above for a larger version.

Pour Off

Pour Off – Big Bend National Park, Texas
Copyright © 2011 Jeff Lynch Photography
Shot taken with a Canon EOS 5D Mark II set on aperture (Av) priority using an EF 24-105mm f/4L IS USM lens tripod mounted. The exposure was taken at 24mm, f/14 for 1/4th of a second at ISO 100 using a Singh-Ray warming polarizer filter. Post capture processing was done in Adobe’s Lightroom 3.
Click on the image above for a larger version.

Sotol Vista at Big Bend National Park

What a view!

Sotol Vista

Sotol Vista – Big Bend National Park, Texas
Copyright © 2011 Jeff Lynch Photography
Shot taken with a Canon EOS 5D Mark II set on aperture (Av) priority using an EF 17-40mm f/4L USM lens tripod mounted. The exposure was taken at 21mm, f/16 for 1/15th of a second at ISO 100 using a Singh-Ray warming polarizer filter and 2-stop, soft, graduated neutral density filter. Post capture processing was done in Adobe’s Lightroom 3.
Click on the image above for a larger version.

Inclement Weather

It finally rains in Southeast Texas. After months and months of extreme drought, the Houston area finally had its first full day of inclement weather. YeaHa! We picked up a bit less than 2 inches of rainfall in Sugar Land this weekend and the trees, grass and wildlife are beginning to come alive again. And the best news we’ve had is that all of East Texas is due for rain this coming week.

We thank thee Oh Lord for the gift of life, of light and of much needed rain. Amen!

Inclement Weather

Inclement Weather – Sugar Land, Texas
Copyright © 2009 Jeff Lynch Photography
Shot taken with a Canon EOS 5D Mark II set on aperture (Av) priority using an EF 24-105mm f/4L IS USM lens tripod mounted. The exposure was taken at 28mm, f/11 for 1/125th of a second at ISO 100 using a Singh-Ray warming polarizer filter and 2-stop graduated neutral density filter. Post capture processing was done in Adobe’s Lightroom 3.
Click on the image above for a larger version.

Understanding the Differences Between Canon’s EF and EF-S Lenses

It’s been a while since I posted this article the first time so I thought it time to clear up a little misinformation I’ve seen floating around the web lately.

What is this Field of View Crop Factor (1.6x FOVCF) everyone keeps talking about and how does this affect my lens choices for the Canon DSLR cameras?

As you know the sensor in the new Rebels, EOS 60D and EOS 7D are much smaller than the full frame sensor found in Canon’s high-end DSLRs like the EOS 5D Mark II and 1D Mark IV. The physical focal length is a optical measurement of a lens and does not change just because you mount it on a 1.6x FOVCF camera like the 60D or 7D, but the field of view the lens exhibits certainly does.

For example, if you are looking for a field of view that a 50mm lens provides on a full-frame DSLR body like the 5D Mark II, you’ll probably want a 35mm lens on your 60D since 1.6 x 35mm = 56mm. The lens is still a 35mm lens, but the final image captured by your 60D will only include a crop of the lens’ complete image.

Wildlife photographers really love the benefit of using high crop factor (1.6x) DSLRs like the 60D or 7D since they can achieve tight subject framing from a greater distance or from the same distance with a shorter, less expensive lens. Using an EF 500mm f/4 L IS USM telephoto lens on a 60D yields the same field of view as an 800mm f/4 IS USM lens would on a 5D Mark II.

So where does the EF-S lens fit in this?

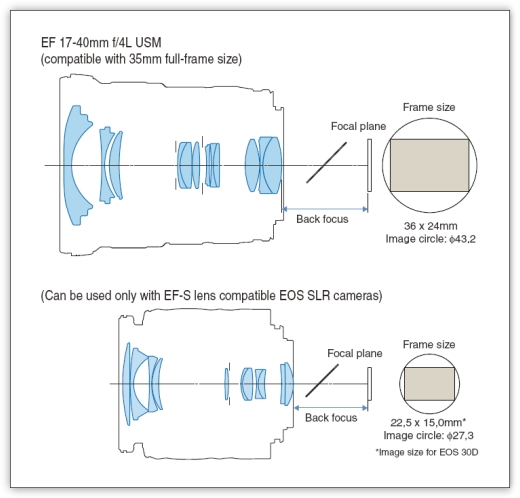
Canon developed the EF-S series lenses (the “S” stands for short back focus) with the rear element of the lens closer to the image sensor than on the EF series lenses. They also matched the image circle of these lenses to the APS-C sensor size. This design enables EF-S lenses to be made smaller, lighter and less expensive. A perfect match for their consumer and prosumer grade DSLR cameras.

Comparing Canon's EF and EF-S Lenses

Canon EF-S lenses are designed specifically for the 1.6x FOVCF DSLR bodies but still require the same 1.6x crop factor to be applied as the standard Canon EF Lenses to get the equivalent field of view comparison. Again, this is because the physical focal length of the lens is the same, regardless of which camera it’s mounted on.

The Canon EF-S 10-22mm f/3.5-4.5 USM is a great example of a well designed EF-S series lens. It provides a field of view similar to what Canon’s popular EF 16-35mm f/2.8 L II USM and EF 17-40mm f/4.0 L USM do on a full frame camera like the 5D Mark II.

Remembering Bastrop State Park

Rather than focus on the recent wildfire destruction of Bastrop State Park, I thought I’d present two images that sum up how I’ll always remember this picturesque and historic state park.

Bastrop State Park Lake

Bastrop State Park Lake – Bastrop, Texas
Copyright © 2010 Jeff Lynch Photography
Shot taken with a Canon EOS 5D Mark II set on aperture (Av) priority using an EF 17-40mm f/4L USM lens tripod mounted. The exposure was taken at 23mm, f/16 for 1/30th of a second at ISO 100 using a Singh-Ray warming polarizer filter. Post capture processing was done in Adobe’s Lightroom 3.
Click on the image above for a larger version.

Fishing at Bastrop State Park

Fishing at Bastrop State Park – Bastrop, Texas
Copyright © 2011 Jeff Lynch Photography
Shot taken with a Canon EOS 5D Mark II set on aperture (Av) priority using an EF 70-200mm f/4L IS USM lens tripod mounted. The exposure was taken at 155mm, f/8 for 1/125th of a second at ISO 100 using a Singh-Ray warming polarizer filter. Post capture processing was done in Adobe’s Lightroom 3.
Click on the image above for a larger version.

Using Alien Skin Bokeh for Wildlife Photography

I realize that this post may offend a certain population of wildlife photographers out there and for that I do apologize. I’m not a wildlife photography “purist” and I will enhance my wildlife images in Lightroom or Photoshop just as I do my commercial, portrait or landscape work. I do this in wildlife images for the very same reason I do it in other types of images, to tell a story and to evoke an emotional response. For me, that’s what photography is all about.

Having said that, I do realize that many well known wildlife photographers (and most wildlife magazines) require that the image be manipulated as little as possible, just as a photojournalist would when covering the war in Iraq for example. I certainly respect that style of wildlife photography but it’s just not my style and that’s why I’ll always let you know when I’ve manipulated a wildlife image during post capture processing as I did in this image below.

Flying Solo Again

Flying Solo
Copyright © 2008 Jeff Lynch Photography
Shot taken with a Canon EOS 50D set on aperture priority (Av) using an EF 300mm f/4 L IS USM + EF 1.4x Extender monopod-mounted. The exposure was taken at 420mm, f/5.6 for 1/500th of a second at ISO 100 on SanDisk digital film. Post capture processing was done in Lightroom 2 and Photoshop CS4 using Alien Skin’s “Bokeh” plug-in filter. Click on the image above for a larger version.

My first step in creating this image was to process it as I would normally do in Lightroom. I generally work on the Basic settings like Exposure, Recovery (very important), Blacks (also very important), Brightness and overall Contrast. I almost always crank up the Clarity (adding mid-tone contrast) and Vibrance (adding mid-tone saturation) and may play with these two settings for 20 or 30 minutes until I find a combination I like.

At this point, my work in Lightroom is complete and my next step is to export the image in Photoshop CS5 and use the Quick Selection tool to select the duck as shown here. Although the selection doesn’t have to be pixel perfect, it always pays in realism to spend a little extra time making a thorough selection of all parts of the subject.

Using the Quick Select Tool

Once you’ve got a basic selection done it’s time to use the Refine Edge tool to Smooth, Feather and Expand the selection you’ve just made. For birds in flight these are the settings I normally use to make sure all the bird’s feathers are included in the selection.

Refine, Expand & Feather the Selection

Once that’s done your new selection should look something like this.

Selection Refined

You’ll understand why this step is vital when you begin to play around with the settings in the Alien Skin Bokeh plug-in filter.
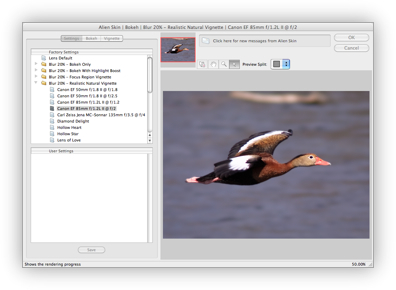
Using Alien Skin Bokeh

Bokeh provides creative controls to enhance images by focusing the viewer’s attention anywhere you want. In the image above, the Bokeh plug-in was used to enhance the background blur. This allows me to shoot the image at f/5.6, which is the fastest my Canon EF 300mm f/4L + 1.4x Extender can go, but make it appear as if I shot it with Canon’s much more expensive EF 400mm f/2.8 lens. Blurring the background in an image like this one makes the subject “pop” and seem that much sharper.

Another trick to enhance an image like this is to apply some sharpening  to the subject only, as shown below.

Using Sharpener Pro on the Original Selection

It’s easy to do this by clicking on the layer that your selection is on and using Nik Software’s Sharpener Pro plug-in. I prefer this plug-in because it acts more subtly and with fewer artifacts showing up in the final image. Sharpening only the selection is important since you’d hate to mess up that beautifully blurred background you just created using Bokeh.

Blending Layers in Photoshop

The final step in Photoshop CS5 is to blend the three layers you’ve just created using Lightroom (background layer), Alien Skin’s Bokeh (bokeh layer) and Nik Software’s Sharpener Pro (sharpener pro layer). Now you could do this simply by flattening the layers but I suggest you take a little time and experiment with the Opacity of each layer until you achieve the desired results. I tend to blend the Bokeh layer at 100% but the Sharpener Pro layer at only 60% – 80% to achieve the most realistic look to my image.

Once you’ve completed this process, you just save the image in Photoshop and it should automatically show up in Lightroom, ready to be exported or printed.