Every lens manufacturer has a few secret weapons in it’s arsenal. For landscape photographers shooting panoramas with Canon DSLRs one of these is the TS-E 24mm f/3.5 L II tilt & shift lens introduced in early 2009. As I’ve said before, the Canon TS-E 24mm f/3.5L II is quite possibly the sharpest lens Canon has ever released. It’s certainly the sharpest lens I’ve ever owned. If you’re interested in all the technical details I recommend reading the in-depth review at The-Digital-Picture.com.

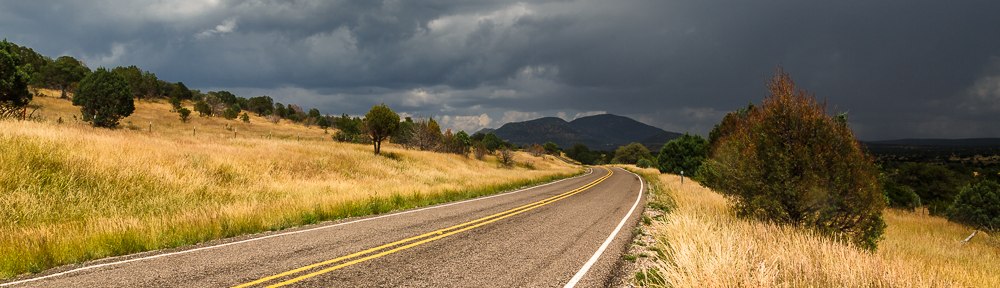
Caprock Canyons Panorama – Quitaque, Texas
Copyright © 2010 Jeff Lynch Photography
Shot taken with a Canon EOS 5D Mark II set on aperture (Av) priority using a TS-E 24mm f/4L II USM lens tripod mounted. The three exposures were taken at 24mm, f/16 for 1/15th of a second at ISO 100 using a Singh-Ray warming polarizer and 2-Stop (Soft) ND-Grad filter. Post capture processing was done in Photoshop CS5 using the “Merge to Panorama in Photoshop” command in Lightroom 3.
One of the areas that a tilt & shift lens really excels in is panorama photography, Shooting pano’s is something I’ve always wanted to try but never did due to the cost of the special panning components required to turn your tripod and ball head into a pano rig. Once I bought the TS-E 24mm f/3.5 L II tilt & shift lens for my commercial work I found a much simpler method for a three or five shot landscape panorama that requires no additional hardware.
In-Camera Technique
This simple technique is based solely upon the “shift” capabilities of a tilt & shift lens and almost completely eliminates parallax (uneven overlap) and distortion.
- Setup your camera & lens on your tripod, taking care to ensure the camera is level. I use a simple $25 bubble-level to accomplish this in seconds.
- Focus on your subject manually and take your first exposure with the lens “unshifted”.
- Shift the lens to the left as far as it will go without creating vignetting, and take your second exposure. Be careful not to refocus or to change the exposure settings too much.
- Shift the lens to the right as far as it will go without creating vignetting, and take your third exposure. Be careful not to refocus or to change the exposure settings too much.

Lens Images Courtesy & Copyright © The Digital Picture
")
1. Lens Shifted Left
")
2. Lens Centered
")
3. Lens Shifted Right
Post Capture Processing
Once you return home simply process all three shots in Lightroom 3 keeping the exposure and other settings as similar as possible between all three. Then select all three images and select “Edit In” from the “Photo” menu. The choose “Merge to Panorama in Photoshop …”. Once Photoshop opens just select the default options and in a few minutes your three-image panorama will appear. Save this file to Lightroom and complete your post-capture processing as normal.
The results? Well, see for yourself by clicking on the image above.
Further Reading
Canon’s Digital Learning Center – Tilt & Shift Lenses.
Canon’s Digital Learning Center – An Introduction to Canon’s New Tilt-Shift Lenses
Really Right Stuff’s – Panoramas Made Simple


")
")


