Desert Hike

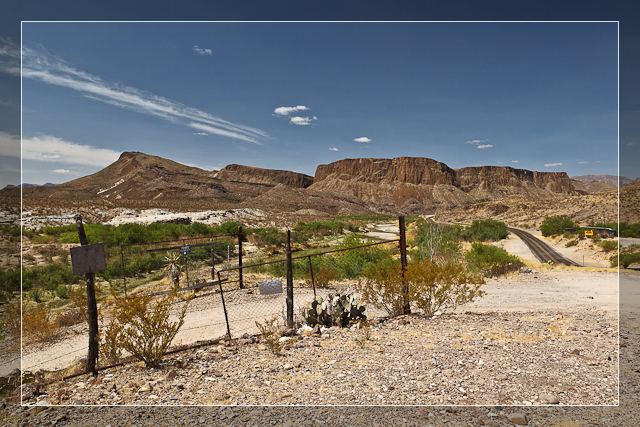
For me, the best time to hike the desert is in the early evening when the sun begins to set and cast long, warm shadows over the terrain. The sky becomes a deep cobalt blue that no polarizing filter can ever mimic and the last traces of moisture in the air are long gone. It’s a “golden” time for photographers to capture and the closest thing to “point & shoot” we ever come by. With light and landscape like this, it’s hard to miss!

Have a Great Weekend Y’all…

Desert Hike

Desert Hike – Big Bend National Park, Texas
Copyright © 2011 Jeff Lynch Photography
Shot taken with a Canon EOS 5D Mark II set on aperture (Av) priority using an EF 17-40mm f/4L USM lens tripod mounted. The exposure was taken at 22mm, f/16 for 1/125th of a second at ISO 100 using a Singh-Ray warming polarizer filter. Post capture processing was done in Adobe’s Lightroom 3.
Click on the image above for a larger version.

Burro Mesa Pouroff – Big Bend National Park, Texas

Map to Burro Mesa

The hike to the Burro Mesa Pouroff in Big Bend National Park is an easy 1/2 mile stroll through 26 million years of geology. Getting there is an easy drive along the Ross Maxwell Scenic Drive and right down the road from the beautiful Sotol Vista and the Homer Wilson Ranch.

The pour off is a long narrow shoot that drains from the top of the mesa during the rainy season. Most of the year it is a dry wash exposing the unique rhyolite layers found on the western slope of the Chisos Mountains. Watch out when it rains however. During a summer shower this narrow pour off and dry wash can flood quickly, catching hikers off guard. Looking up at this incredible wonder it’s easy to imagine all that water cascading down from above.

Burro Mesa Pouroff

Burro Mesa Pouroff – Big Bend National Park, Texas
Copyright © 2011 Jeff Lynch Photography
Shot taken with a Canon EOS 5D Mark II set on aperture (Av) priority using an EF 17-40mm f/4L USM lens tripod mounted. The exposure was taken at 20mm, f/14 for 1/30th of a second at ISO 100 using a Singh-Ray warming polarizer filter. Post capture processing was done in Adobe’s Lightroom 3 and Adobe Photoshop CS5.
Click on the image above for a larger version.

Fences Along the Rio Grande

Standing 20 yards from the Mexican border. Not exactly what you expected to see, huh?

Fences

Fences – Big Bend Ranch State Park, Texas
Copyright © 2011 Jeff Lynch Photography
Shot taken with a Canon EOS 5D Mark II set on aperture (Av) priority using an EF 24-105mm f/4L IS USM lens tripod mounted. The exposure was taken at 28mm, f/14 for 1/40th of a second at ISO 100 using a Singh-Ray warming polarizer filter. Post capture processing was done in Adobe’s Lightroom 3.
Click on the image above for a larger version.

Combining Work and Pleasure

It’s not often you get to combine work and pleasure, even for a photographer that loves his work. This is especially true for most landscape photographers that would much rather be hiking and photographing in Big Bend National Park or Palo Duro Canyon State Park rather than shooting commercial assignments on location or in a studio. Sometimes however, you get the chance to photograph the great outdoors without having to drive 500 miles to find a suitable location. Yes, even a blind squirrel occasionally finds an acorn!

Sugar Creek Jones #1

Sugar Creek Country Club Jones #1 – Sugar Land, Texas
Copyright © 2011 Jeff Lynch Photography
Shot taken with a Canon EOS 5D Mark II set on aperture (Av) priority using an EF 24-105mm f/4L IS USM lens tripod mounted. The exposure was taken at 50mm, f/16 for 1/15th of a second at ISO 100 using a Singh-Ray warming polarizer filter. Post capture processing was done in Adobe’s Lightroom 3.
Click on the image above for a larger version.

Sugar Creek Jones #3

Sugar Creek Country Club Jones #3 – Sugar Land, Texas
Copyright © 2011 Jeff Lynch Photography
Shot taken with a Canon EOS 5D Mark II set on aperture (Av) priority using an EF 24-105mm f/4L IS USM lens tripod mounted. The exposure was taken at 28mm, f/16 for 1/13th of a second at ISO 100 using a Singh-Ray warming polarizer filter. Post capture processing was done in Adobe’s Lightroom 3.
Click on the image above for a larger version.

Balanced Rock – Big Bend National Park

The image used in yesterday’s tutorial for your viewing enjoyment! Click on the image for a larger version that makes a great desktop background for your MacBook (hint, hint).

Balanced Rock

Balanced Rock – Big Bend National Park, Texas
Copyright © 2011 Jeff Lynch Photography
Shot taken with a Canon EOS 5D Mark II set on aperture (Av) priority using an EF 24-105mm f/4L IS USM lens tripod mounted. The exposure was taken at 65mm, f/14 for 1/30th of a second at ISO 100 using a Singh-Ray warming polarizer filter. Post capture processing was done in Adobe’s Lightroom 3.
Click on the image above for a larger version.

Adobe Lightroom 3 Poster Tutorial

I often receive comments and questions from readers that are curious how I create the posters I sell and what software I use. I covered this in detail early last year but it’s well worth the time to review once more today.

As you know, there are several different ways to create a poster in Photoshop CS4 or CS5 and Scott Kelby’s books explain most of these methods in great detail. Being lazy, I prefer to let Adobe’s Lightroom 3 Print Module do the heavy lifting most of the time.

Balanced Rock - Big Bend National Park Poster

The first step in creating this type of Print Template is to setup a custom Page Size in Lightroom 3 such as the 20″ x 16″ page shown above. I chose 20″ x 16″ since its a common frame size available and the white borders used result in a very viewable 17″ x 11″ image size.

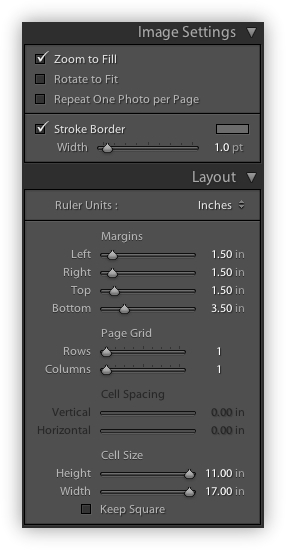
Once you’ve set your page size you’ll need to change the Image Settings as shown below to add a medium gray Stroke Border around your image giving it the appearance of being matted.
Lightroom Image Settings & Layout

Lightroom Image Settings & Layout

To create a poster Layout, you’ll need to change the Margins to add the white border and set the Page Grid to 1 row and 1 column. This should result in a Cell Size exactly 17″ wide and 11″ high.

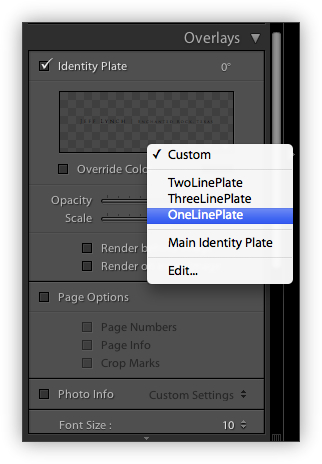
I use Lightroom 3’s Overlay settings to add a custom Identity Plate to the white border below the image as shown below.
Lightroom's Overlay Settings

Lightroom's Overlay Settings

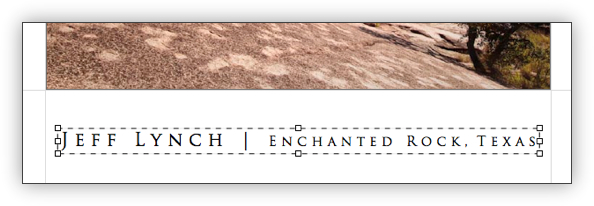
This is where things can get a little tricky so I’ve created three custom Identity Plate templates including a one-line, two-line and three-line version to add and modify as needed.
Lightroom's Identity Plate

Centering Lightroom's Identity Plate

Centering the Identity Plate in the bottom white border can also be a little tricky and this feature has been improved only slightly in the Lightroom 3.

The best way I’ve found to do this is enlarge it to 100% and then center it with the edges of your image, moving it up and down, little by little until it looks about right. Then reduce to to somewhere between 60% – 75% until the text is smaller than the image width as shown above.

Editing an Identity Plate

Editing an Identity Plate

A few tricks to make this look really nice:

  • Use an all-caps font like Trajan Pro for a really elegant look.
  • Add a blank space between each letter in a word and three blank spaces between each word.
  • Create a multi-line identity plate by adding pressing Option+Return to start a new line.
  • Use different font sizes for different parts of the identity plate.

Once you’ve finished this you can save your poster as a Print Template to use again and again.

Grapevine Hills – Big Bend National Park

One of my favorite trails in Big Bend National Park leads through a unique geological formation called Grapevine Hills, deep into the desert just north of the Chisos Mountains. Hiking into this unique canyon is a bit like stepping foot on another planet. The rock formations are intriguing to explore and the scale is difficult to comprehend, especially for small creatures like my little friend here. It’s not often that Jack and I hire a trail guide but this little feller came highly recommended and he seemed to find the trail markers with no trouble at all.

Grapevine Hills

Grapevine Hills – Big Bend National Park, Texas
Copyright © 2011 Jeff Lynch Photography
Shot taken with a Canon EOS 5D Mark II set on aperture (Av) priority using an EF 24-105mm f/4L IS USM lens tripod mounted. The exposure was taken at 32mm, f/14 for 1/30th of a second at ISO 100 using a Singh-Ray warming polarizer filter. Post capture processing was done in Adobe’s Lightroom 3.
Click on the image above for a larger version.

Trail Markers

Trail Markers – Big Bend National Park, Texas
Copyright © 2011 Jeff Lynch Photography
Shot taken with a Canon EOS 5D Mark II set on aperture (Av) priority using an EF 24-105mm f/4L IS USM hand-held. The exposure was taken at 105mm, f/4 for 1/400th of a second at ISO 100 using a Singh-Ray warming polarizer filter. Post capture processing was done in Adobe’s Lightroom 3.
Click on the image above for a larger version.

Gorman Creek Before the Drought

Here’s another shot taken during the Texas Landscape Safari last April. Gorman Creek is a spring fed stream running northeast into the Colorado River just below Bend, Texas. Most every spring that I can recall, this creek is usually flowing strongly through its two mile length, creating the magnificent Gorman Falls as it cascades into the Colorado. This year’s drought came early and hit us hard. I suspect this is as much water as we’ll see in Gorman Creek until the winter rains return.

Gorman Creek

Gorman Creek Before the Drought – Bend, Texas
Copyright © 2010 Jeff Lynch Photography
Shot taken with a Canon EOS 5D Mark II set on aperture (Av) priority using an EF 70-200mm f/4L IS USM lens tripod mounted. The exposure was taken at 93mm, f/13 for 1/125th of a second at ISO 100 using a Singh-Ray warming polarizer filter. Post capture processing was done in Adobe’s Lightroom 3 and Photoshop CS5.
Click on the image above for a larger version.