Here’s another simple but effective way to capture a very high contrast image without resorting to HDR techniques. Not that I have anything serious against HDR, but I find it very rewarding to be able to capture a shot like this “in camera”.
Yes, I know I’m an old fuddy-duddy but hey, I earned every one of those gray hairs.

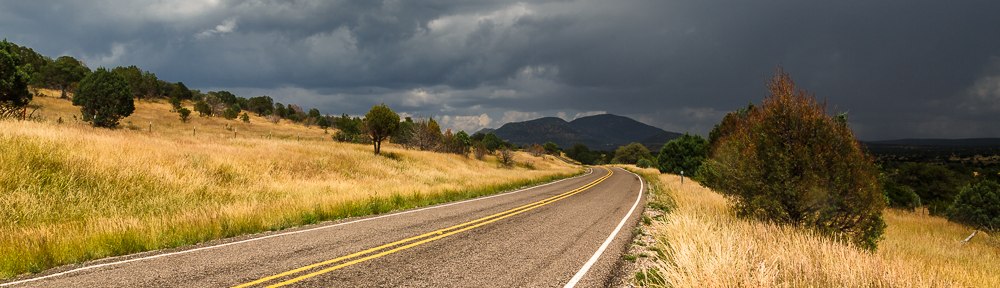
Evening Drama – Johnson City, Texas
Copyright © 2010 Jeff Lynch Photography
Shot taken with a Canon EOS 5D Mark II set on aperture (Av) priority using an EF 17-40mm f/4L USM lens tripod mounted. The exposure was taken at 19mm, f/16 for 1/6th of a second at ISO 200 with a Singh-Ray warming polarizer filter and 2-stop graduated neutral density filter. Post capture processing was done in Adobe’s Lightroom 3.
Click on the image above for a larger version.
View Location on Panoramio & Google Earth: Evening Drama – Johnson City, Texas
How to Get this Type of Shot
The key to getting this type of shot is to recognize that the dynamic range of this scene is well beyond what your camera’s metering system can handle. In fact, the dark-to-light-to-dark pattern found in this scene is sure to fool your camera’s meter most of the time.
- For Canon shooters this type of situation call for enabling your camera’s Highlight Tone Priority setting which “shifts” the sensor’s response curve (dynamic range) so that gradations between highlight tones become smoother. It also helps recover blown-out highlights as you can see in the center of this shot. You should always have your camera’s highlight warning (blinkies) turned on as well.
- Another key is to use a graduated neutral density filter to “even out” the exposure values between the foreground, middle ground and background. I prefer to hand-hold Singh-Ray’s “soft” graduated ND filters and move them slightly during the exposure to obtain an even softer transition. Yes, this may create some dark areas in your image that need some post-capture work since an ND-Grad filter won’t follow the broken shape of your scene’s horizon.
- The final key is to slightly underexpose this type of shot to add drama to the clouds and add saturation to the colors in the scene. If you overexpose a shot like this the highlights will be completely blown out and all the detail will be lost forever. No amount of post-capture processing can recover blown out highlights because there is simply no data to recover. I generally underexpose a shot like this about two-thirds of a stop to prevent this from happening.
Once you learn to recognize a difficult lighting situation like this, you’re halfway there to capturing a shot you’ll be proud of. Don’t get discouraged if this takes some practice. I took over 30 shots of this scene before I got the “one” that I liked enough to print. The other 29 ended up on the cutting room floor (metaphorically speaking of course).


