As many of you recall some of my best G10 images were been featured in Jeff Carlson’s book; Canon Powershot G10/G11: From Snapshots to Great Shots published by Peachpit Press last December. If you shoot with one of Canon’s Powershot “G” series cameras, this book is a great resource for taking your photography to the next level.
One thing that was lacking in this book however, was a good chapter on post-capture processing of the high-resolution raw images generated by the “G” series cameras into stunning JPEG files ready for printing or publication on the web. I’ve talked about this briefly in previous posts but I thought it was time to describe my current G10 post processing methods in enough detail, so that any amateur using this camera and Adobe Lightroom can achieve consistent results from their G10/G11/G12 cameras.
So here goes nothing . . .
Step 1: The Zeroed RAW File
I don’t generally start with a completely “zeroed” raw file in Lightroom 3 but in this case I wanted to illustrate what the raw file looks like straight from the camera. A raw file exported to a JPEG using Lightroom 3’s “Zeroed” preset. No added contrast, vibrance, clarity, luminance, exposure, brightness, fill light, black point or anything at all. Just dull, lifeless, slightly overexposed raw file.

Starting with a Zeroed File
Step 2: Always Check the Histogram
The first rule I teach during my landscape workshops is to always check the histogram and never, ever trust the camera’s LCD for judging exposure. This rule holds true in post-capture processing as well. The very first thing to adjust on any raw image is the overall exposure and the Histogram (shown below) displayed in Lightroom 3’s Develop Module is the key.
As you can see in the histogram screenshot below and the zeroed file above, this raw image is slightly overexposed and the bright white clouds in the upper right-hand corner of the frame are slightly blown out (clipped in the histogram). I’ll explain how to correct this in the next few paragraphs but for now, it’s enough to understand that anytime your histogram is clipped on the far left (underexposed) or on the far right (overexposed) you will need to adjust it to create a well exposed image.

Always Check the Histogram
Step 3: Camera Calibration
Strangely enough I normally begin by working my way “up” the panels in Lightroom 3’s Develop Module. For my G10 images I’ll generally use the “Camera Faithful” (Canon Powershot G10) profile for my landscape images because it tends to deepen the earth tones and adds contrast to the sky.

Lightroom's Camera Calibration
Step 4: Lens Corrections
Next I use the new Lens Correction settings and check the Enable Profile Corrections box which fixes any barrel or pincushion distortion, chromatic aberration and vignetting problems inherent in my G10’s built-in zoom lens. This is similar to what the well respected PTLens plugin from Tom Niemann does in Photoshop, although the effect in Lightroom 3 is more subtle.

Correcting Lens Distortion
Step 5: Basic Settings
At this point in my workflow, I’ll adjust the Exposure, Recovery, Brightness and Contrast settings until I find the right exposure balance (lights and darks) and tone (color gradations) for the image. Since this raw file was slightly over exposed I’ll adjust the Recovery settings to prevent the highlight clipping shown in the right end of the histogram. I’ll also add just a bit of Fill Light to open up the deep shadows on the side of the mesa and set the Blacks slightly higher so that the image doesn’t look washed out.
My next step is to adjust the other Basic settings such as White Balance (usually set for Daylight depending upon the image), Clarity (which adds some wonderful mid-tone contrast) and Vibrance and Saturation until I achieve the look I’m after. This process may take as little as five minutes or as much as several hours to accomplish.
Note: It’s important to remember Ansel Adams’ Zone System. To make a scene look realistic you need some bright whites and pure blacks in the shade, so a little “clipping” in the histogram is perfectly acceptable.

Making Basic Exposure & Contrast Corrections
Step 6: Tone Curve
Next I generally adjust the Tone Curve by setting the Point Curve to Medium Contrast which adds contrast to the entire image. Notice how I’ve set my sliders to an almost symmetrical pattern for this image. For most G10/G11/G12 shots, all you need to do is increase the contrast slightly using these sliders. Add too much and your images will look grainy and unrealistic. Add too little and they’ll look flat and dull.

Choosing the Best Tone Curve for Your Image
Progress Report: Starting to Look Better
So let’s review our progress so far. We’ve taken the dull and lifeless raw file we began with and corrected the exposure and added some much needed contrast as shown below. At this point it’s a pretty good snapshot that any amateur visiting Palo Duro Canyon would be proud of, but not exactly the great shot we were after.

Starting to Look Better
Step 7: Luminance
My final “tweaks” to the image are done by adjusting the Luminance settings. This is where my fine tuning is done to create drama in my images. I’ll generally reduce the Aqua and Blue color values to darken the sky and make the clouds stand out more. I’ll also increase the Green and Yellow luminance values to enhance the color of the foliage and in this case I also decided to decrease the Red luminance values to add vibrance to the unique geology of these stratified formations.
Note: I’ve found nothing in Lightroom 3 that works half as well as a circular polarizer does in the field to enhance contrast and add saturation to an image. Luckily, the folks at Lensmate in Seattle make a line of precision machined aluminum lens adapters for the Canon G Series that allow you to add a polarizing filter to the camera without creating a vignetting problem. Lensmate also sells the 72mm low profile Kenko Pro1 Digital CP filter that their adapters are designed to work with.
Small, incremental changes go a long way here, so I’m careful not to push things too far and end up with an image that looks unrealistic. I have enough trouble with folks that don’t live in Texas believing that our skies are actually this blue and our clouds this white.

Making Luminance Corrections to Add Contrast
Step 8: Sharpness and Noise Corrections
This is where the rubber meets the road folks, especially when working with high-resolution images from Canon’s “G” series cameras. The Canon “G” series have a sensor the size of a postage stamp. Packing 10 or 15 megapixels into a sensor this size is no mean feat and it comes with a significant drawback, digital noise.
Now don’t get me wrong. I love the 15 MP resolution of my G10 camera and when exposed properly, the images it produces can rival what my $2700 5D2 does, as I’ve shown in my previous post entitled A Tale of Two Images. However, controlling sharpness and noise in Lightroom 3 is critical for making the most of your G10/G11/G12 images so here are a few counterintuitive suggestions to help you out.
- Sharpen your raw landscape images using the Wide Edges (Faces) setting not the Narrow Edges (Scenic) preset in Lightroom 3. This preset is normally used for sharpening portraits but seems to work well with the high-resolution / high-pixel density raw files created by the G10/G11/G12 cameras. The other setting creates far too much pixelation and noise in the blue skies.
- Use Lightroom 3’s built in noise reduction settings to eliminate luminance and color noise in your G10/G11/G12 images, especially in the shadow areas and the sky. You’ll give up a little sharpness but will gain a printable image using the settings shown below. I’ve tried a hundred different combinations but for the Canon Powershot “G” series, these seem to work best.

Making Sharpness & Noise Corrections
Progress Report: Almost There!
This image is shaping up nicely and needs only a few final tweaks to add some detail and depth.

Now for the Fine Tuning
Step 9: Local Adjustments & Final Effects
As you can see in the next two screenshots, I made extensive use of the adjustment brush to add back detail and saturation in the shadows of the Lighthouse and Castle Peak formations. It’s important to add some saturation when increasing the exposure in a local area using the Adjustment Brush tool to make the image look more realistic. One thing to remember is with any of the local adjustment tools you have incredible flexibility in which adjustments to apply in combination.

Fine Tuning using the Adjustment Brush
I also like to add a slight post-crop vignette to many of my landscape images as another way to draw the viewer’s eye into the scene. With any adjustment, a little bit goes a long way.

Using A Vignette to Finish Your Images
The Final Result
I’m fairly pleased with the final results considering how dull and lifeless the original raw file looked. I also enjoyed experimenting with my G10 specific post-capture process to obtain the best results with the least effort.
A Final Thought
The Canon Powershot “G” series cameras are great tools for moving your photography from “snapshots” to “great shots”. But they’re just tools, like a carpenter’s hammer or a plumber’s pipe-wrench. Have you ever seen two carpenters arguing over which brand of hammer is best? No, I haven’t either.
To move your photography to the next level takes hard work, persistence and patience. It doesn’t matter what brand of camera you choose or how expensive it is. Like all good things in life, the journey to become a better photographer starts with you and lasts a lifetime. So saddle up, lock & load and join me for the ride of a lifetime.

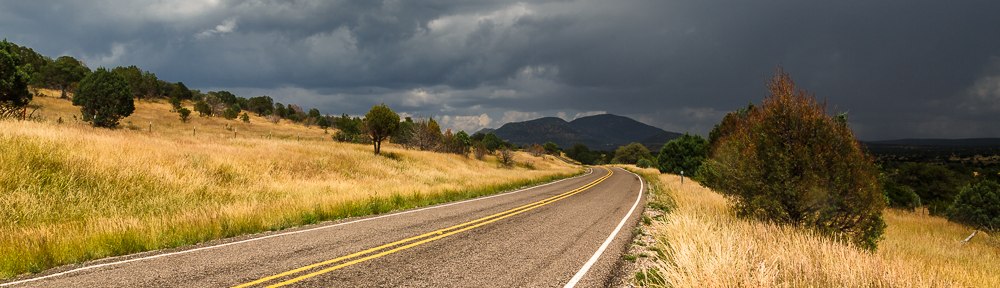
Looking West at Lighthouse – Palo Duro Canyon, Texas
Copyright © 2010 Jeff Lynch Photography
Shot taken with a Canon Powershot G10 set on aperture priority (Av) using a circular polarizer. The exposure was taken at 28mm, f/6.3 for 1/50th of a second at ISO 80. All post capture processing was done in Adobe’s Lightroom 3. Click on the image above for a larger version.
Click on the image above for a larger version.
View Location on Panoramio & Google Earth: Looking West at Lighthouse – Palo Duro Canyon, Texas