It’s the Climb

I’ve travelled all over the world and visited many different countries, landscapes and terrain in my time. I’ve seen the sun rise in Beijing and set in Singapore. I’ve felt the dry, brittle cold of a winter’s day in Alaska and the cold, damp, rainy nights of autumn in Scotland. I’ve walked the quiet hillsides of the Napa Valley and the noisy streets of Hong Kong. I’ve hiked Isle Royal in the springtime and canoed Lake Placid in the fall.

Nowhere I’ve ever travelled has felt more like “home” to me than the Texas Hill Country. Drive a few short hours from Dallas, Houston, San Antonio or Austin and you can find yourself in a region like no other on Earth. A place of contrast, beauty and solitude where the sky stretches almost to heaven. A place you can climb and gaze for miles and miles and see no sign of civilization.

A place called Texas!

Hill Country Hillside - Bandera, Texas

Hill Country Hillside – Bandera, Texas
Copyright © 2009 Jeff Lynch Photography
Shot taken with a Canon EOS 5D Mark II set on aperture priority (Av) using an EF 24-105mm f/4L IS USM lens tripod-mounted. The exposure was taken at 24mm, f/11 for 1/80th of a second using a Singh-Ray LB Warming Polarizer and a 2-stop, graduated neutral density filter at ISO 100 on Lexar Professional digital film. Post capture processing was done in Lightroom 2. Click on the image above for a larger version.

The Things Photographers Do – Part 2

If you’ve read last week’s post entitled The Things Photographers Do you might be curious just how far up we hiked after I took that shot of Garner State Park from above. Well, here’s the view from the top and what a magnificent view it is. That hill just to our right is where I wanted to shoot from but I new that another 100 foot rock climb was beyond my capabilities, even though my 69 year old friend thought we might make it.

So here’s a challenge for you younger landscape photographers. Climb those hills early in your career and enjoy the view. Life is way too short to settle for anything less!

Garner Hillside

Garner State Park Hillside, Texas
Copyright © 2009 Jeff Lynch Photography
Shot taken with a Canon EOS 5D Mark II set on aperture priority (Av) using an EF 24-105mm f/4L IS USM lens tripod-mounted. The exposure was taken at 24mm, f/13 for 1/15th of a second using a Singh-Ray LB Warming Polarizer and a 4-stop, graduated neutral density filter at ISO 100 on Lexar Professional digital film. Post capture processing was done in Lightroom 2 and Photoshop CS4 using Nik Software’s Color Efex Pro plug-in filters. Click on the image above for a larger version.

Landscape Photography – Grand Old Cypress

There is nothing better than a cool breeze on a warm summer morning in the Texas Hill Country. And one of the best places in the world to enjoy this simple pleasure is at the Guadalupe River State Park, near New Braunfels, Texas. The park boasts some of he tallest and oldest Cypress trees in the region and these majestic old trees make wonderful subjects. I do believe they have more wrinkles than I do!

Grand Old Cypress

Grand Old Cypress – Guadalupe River, Texas
Copyright © 2009 Jeff Lynch Photography
Shot taken with a Canon EOS 5D Mark II set on aperture priority (Av) using an EF 24-105mm f/4L IS USM lens tripod-mounted. The exposure was taken at 32mm, f/16 for 1/5th of a second using a Singh-Ray LB Warming Polarizer at ISO 100 on Lexar Professional digital film. Post capture processing was done in Lightroom 2 and Photoshop CS4. Click on the image above for a larger version.

Early Morning on the Guadalupe River

I’ve never been an early riser. In fact my philosophy is if the early bird catches the worm, then the worm should have stayed in bed a wee bit longer. Unfortunately the pursuit of landscape photography generally means getting up before dawn, finding a nice subject in the dim pre-dawn hours and waiting patiently for the sun to create its magic. Making exposure after exposure, changing a little here and a little there, shooting horizontal and vertical and constantly adjusting to the light’s ever changing patterns in hope of catching that one magic moment when everything looks just right. More often than not, that perfect moment never comes and we must be content with catching only a glimpse of what we felt and saw in that early morning light.

Morning on the Guadalupe

Morning on the Guadalupe River, Texas
Copyright © 2009 Jeff Lynch Photography
Shot taken with a Canon EOS 5D Mark II set on aperture priority (Av) using an EF 24-105mm f/4L IS USM lens tripod-mounted. The exposure was taken at 32mm, f/16 for 1/5th of a second using a Singh-Ray LB Warming Polarizer at ISO 100 on Lexar Professional digital film. Post capture processing was done in Lightroom 2 and Photoshop CS4. Click on the image above for a larger version.

The Things Landscape Photographers Do!

Several months ago I was reading an issue of Texas Parks & Wildlife Magazine and saw an image of Garner State Park taken from a vantage point far above the park. Last weekend I was at the park scouting locations for future workshops and thought I’d see if I could find the spot where the image was taken.

So with the trail map and camera in hand and tripod and water in my backpack, I set out to climb the trail leading up to the peak. The first part of the “trail” was about 1/8th of a mile long ascending roughly 100 feet up a rocky cliff face. I darn near gave up right there but with the help of a friend I ascended the slope without breaking my neck.

The next section of the trail was about 1/3rd of a mile long and labeled on the trail map as “Very Steep”. I was starting to get a little nervous as we climbed from ledge to ledge using the tree roots as hand-holds wherever possible. We ascended over 300 feet in that 1/3rd of a mile and finally reached a ledge where I could setup my tripod and get to work.

We hiked along the top of this mountain for another 2 miles until we found a good trail to descend on without breaking our necks. I took about 90 shots during that morning and several of the views were really spectacular but I kept thinking to myself “the things we landscape photographers will do to get the shot!”.

Garner From Above

Garner from Above, Texas
Copyright © 2009 Jeff Lynch Photography
Shot taken with a Canon EOS 5D Mark II set on aperture priority (Av) using an EF 24-105mm f/4L IS USM lens tripod-mounted. The exposure was taken at 24mm, f/16 for 1/13th of a second using a Singh-Ray LB Warming Polarizer and a 4-stop, graduated neutral density filter at ISO 100 on Lexar Professional digital film. Post capture processing was done in Lightroom 2 and Photoshop CS4 using Nik Software’s Viveza filter. Click on the image above for a larger version.

Landscape Photography – Just Add Water

Happy Monday everyone!

I just returned from a three day trip to west Texas in search of water. The entire state of Texas has been under an incredibly harsh drought for the past year but last week we finally began to receive some much needed rain. Not a lot mind you, but just enough to satisfy a landscape photographer on a mission.

Frio River in Concan, Texas

Frio River in Concan, Texas
Copyright © 2009 Jeff Lynch Photography
Shot taken with a Canon EOS 5D Mark II set on aperture priority (Av) using an EF 24-105mm f/4L IS USM lens tripod-mounted. The exposure was taken at 24mm, f/16 for 1/15th of a second using a Singh-Ray LB Warming Polarizer and a 4-stop, graduated neutral density filter at ISO 100 on Lexar Professional digital film. Post capture processing was done in Lightroom 2 and Photoshop CS4 using Nik Software’s Viveza filter. Click on the image above for a larger version.

Texas Landscape Safari Update 2

Update: I’m heading out to West Texas for a few days of landscape and nature work for my book. Just so y’all won’t be too lonely without my regular posts, here are a few links full of beautiful Texas scenery to inspire you!

Jerod Foster’s Blog

Wyman Meinzer’s Blog

Laurence Parent’s Texas

We still have a few spots open for our Texas Landscape Safari workshop scheduled for October 18 – 21, 2009 in the beautiful Texas Hill Country. Now that the rains have returned and the weather looks to be wetter in September and October, the rivers and streams should be running and provide some wonderful shots for our attendees.

Here’s a quick look at what we’ve scheduled for this workshop. You can click on this image to be taken directly to our Google Map for the workshop.

Texas Landscape Safari Map

We’ll be shooting at the following locations and the conditions look favorable for getting some great landscape shots in the Hill Country this fall.

  • Colorado Bend State Park – Bend, Texas
  • Inks Lake State Park – Burnet, Texas
  • Longhorn Cavern State Park – Burnet, Texas
  • Scenic Overlook – Kingsland, Texas
  • Enchanted Rock State Natural Area – Fredericksburg, Texas
  • Pedernales Falls State Park – Johnson City, Texas
  • McKinney Falls State Park – Austin, Texas

Using Alien Skin’s Bokeh for Wildlife Photography

I realize that this post may offend a certain population of wildlife photographers out there and for that I do apologize. I’m not a wildlife photography “purist” and I will enhance my wildlife images in Lightroom or Photoshop just as I do my commercial, portrait or landscape work. I do this in wildlife images for the very same reason I do it in other types of images, to tell a story and to evoke an emotional response. For me, that’s what photography is all about.

Having said that, I do realize that many well known wildlife photographers (and most wildlife magazines) require that the image be manipulated as little as possible, just as a photojournalist would when covering the war in Iraq for example. I certainly respect that style of wildlife photography but it’s just not my style and that’s why I’ll always let you know when I’ve manipulated a wildlife image during post capture processing as I did in this image below.

Flying Solo Again

Flying Solo
Copyright © 2008 Jeff Lynch Photography
Shot taken with a Canon EOS 50D set on aperture priority (Av) using an EF 300mm f/4 L IS USM + EF 1.4x Extender monopod-mounted. The exposure was taken at 420mm, f/5.6 for 1/500th of a second at ISO 100 on SanDisk digital film. Post capture processing was done in Lightroom 2 and Photoshop CS4 using Alien Skin’s “Bokeh” plug-in filter. Click on the image above for a larger version.

My first step in creating this image was to process it as I would normally do in Lightroom. I generally work on the Basic settings like Exposure, Recovery (very important), Blacks (also very important), Brightness and overall Contrast. I almost always crank up the Clarity (adding mid-tone contrast) and Vibrance (adding mid-tone saturation) and may play with these two settings for 20 or 30 minutes until I find a combination I like.

At this point, my work in Lightroom is complete and my next step is to export the image in Photoshop CS4 and use the Quick Selection tool to select the duck as shown here. Although the selection doesn’t have to be pixel perfect, it always pays in realism to spend a little extra time making a thorough selection of all parts of the subject.

Using the Quick Select Tool

Using the Quick Select Tool

Once you’ve got a basic selection done it’s time to use the Refine Edge tool to Smooth, Feather and Expand the selection you’ve just made. For birds in flight these are the settings I normally use to make sure all the bird’s feathers are included in the selection.

Refine, Expand & Feather the Selection

Smooth, Feather & Expand the Selection

Once that’s done your new selection should look something like this.

Selection Refined

Selection Refined

You’ll understand why this step is vital when you begin to play around with the settings in the Alien Skin Bokeh plug-in filter.
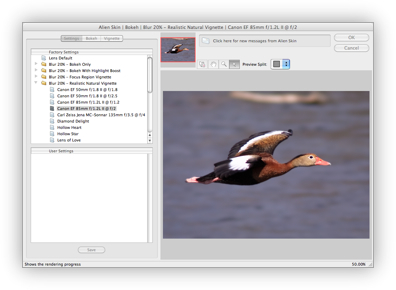
Click on the Image Above for a Larger View

Click on the Image Above for a Larger View

Bokeh provides creative controls to enhance images by focusing the viewer’s attention anywhere you want. In the image above, the Bokeh plug-in was used to enhance the background blur. This allows me to shoot the image at f/5.6, which is the fastest my Canon EF 300mm f/4L + 1.4x Extender can go, but make it appear as if I shot it with Canon’s much more expensive EF 400mm f/2.8 lens. Blurring the background in an image like this one makes the subject “pop” and seem that much sharper.

Another trick to enhance an image like this is to apply some sharpening  to the subject only, as shown below.

Using Sharpener Pro on the Original Selection

Click on the Image Above for a Larger View

It’s easy to do this by clicking on the layer that your selection is on and using Nik Software’s Sharpener Pro plug-in. I prefer this plug-in because it acts more subtly and with fewer artifacts showing up in the final image. Sharpening only the selection is important since you’d hate to mess up that beautifully blurred background you just created using Bokeh.

Blending Layers in Photoshop

Blending Layers in Photoshop

The final step in Photoshop CS4 is to blend the three layers you’ve just created using Lightroom (background layer), Alien Skin’s Bokeh (bokeh layer) and Nik Software’s Sharpener Pro (sharpener pro layer). Now you could do this simply by flattening the layers but I suggest you take a little time and experiment with the Opacity of each layer until you achieve the desired results. I tend to blend the Bokeh layer at 100% but the Sharpener Pro layer at only 60% – 80% to achieve the most realistic look to my image.

Once you’ve completed this process, you just save the image in Photoshop and it should automatically show up in Lightroom, ready to be exported or printed.