Dinner Time!

Just another interesting image from my last visit to the Brazos Bend State Park. Seems like someone is looking for a little snack. It was a great day to be a nature photographer. More to come!

Dinner Time

Dinner Time
Copyright © 2008 Jeff Lynch Photography
Shot taken with a Canon 40D , 70-200mm f/4L with a 1.4x extender at 280mm, f/5.6, 1/250th sec at ISO 200 on SanDisk Digital Film.

Stand Up and Be Counted!

If there’s one thing that I’ve learned photographing birds it’s to expect the unexpected. I was walking around the Brazos Bend State Park on Friday hoping to catch some birds in flight and practice my long-lens technique. I wasn’t having much luck when I heard the strangest cackling sound coming from behind me. I turned around to see what all the fuss was about and spotted this little guy standing straight at attention as if speaking to a crowd of people. I guess it’s an election year in the wild kingdom also!

Stand Up and Be Counted

Stand Up and Be Counted
Copyright © 2008 Jeff Lynch Photography
Shot taken with a Canon 40D , 70-200mm f/4L with a 1.4x extender at 280mm, f/5.6, 1/60th sec at ISO 200 on SanDisk Digital Film.

Lightroom 2’s Creative Presets

Adobe’s Lightroom 2 comes with some really high quality creative “presets” that are a great way to create a custom look for a series of images like the ones I displayed in my previous post entitled Life in 1830’s Texas. You can use these as is or as the starting point for your own custom presets.

Matt Kloskowski has created a slew of presets available to download from his Lightroom Killer Tips blog and they are simply brilliant! I’m not quite sure how Matt fits all this in his busy schedule but I’m sure glad he does.

Creating effects like these used to take hours in Photoshop and sometimes days or weeks in the darkroom trying out various dodging and burning techniques and sepia toning. Using these presets in Lightroom takes only seconds and it’s completely non-destructive editing. If you don’t like the results simply undo the preset.

I’ve listed the standard presets that come with Lightroom 2 in the image at the right and examples of each in the images below.

Original As Shot

Original “As Shot”

Aged Photo

Creative – Aged Photo

Antique Grayscale

Creative – Antique Grayscale

Antique Light

Creative – Antique Light

B&W High Contrast

Creative – B&W High Contrast

B&W Low Contrast

Creative – B&W Low Contrast

Cold Tone

Creative – Cold Tone

Cyanotype

Creative – Cyanotype

Direct Positive

Creative – Direct Positive

Selenium Tone

Creative – Selenium Tone

Sepia

Creative – Sepia

Copyright © 2008 Jeff Lynch Photography

Shot taken with a Canon 40D , 17-40mm f/4 L at 17mm, f/13, 1/100th sec at ISO 200 on SanDisk digital film.

Mark Krajnak’s Jersey Noir

I got an email from Mark Krajnak yesterday after he saw a comment I made on Joe McNally’s blog. Mark is the guy in suit & hat in the first image on Joe’s The Hot Shoes Diary post. Joe mentions Jimmy Stewart’s 1955 classic Rear Window and all I can think about is Grace Kelly (be still my beating heart!) and how most of Joe’s fans are under 40 and have probably never seen the film. My kids still moan and groan when I start watching the old favorites like Rear Window,

Well, Mark shoots me an email and a link to his Jersey Noir gallery. Wow! What a great set of images and what a great idea for a theme. Stop on over to Mark’s Flicker gallery and see for yourself. Talk about stepping back in time!

If you’re wondering why I still swoon over Grace Kelly take a look of this still from the movie. As they used to say, “Oh Man, what a doll”.

Lightroom 2 Collections and Collection Sets

If you’re anything like me, on an average weekend you’ll shoot somewhere around 300 – 400 images at several different locations. When you return home, you load these into Adobe’s Lightroom 2 and begin the long and difficult task of sorting through this mountain of images, deciding which to throw out, which to keep (just in case) and which to further process for display on a website or for printing. I approach this critically important task with a wide range of emotions, from pure joy at finding a few well composed, tack sharp images to downright embarrassment at finding dozens of out-of-focus and poorly exposed images.

This whole process really bogged me down until I watched a few videos by Matt Kloskowski at Kelby Training. Matt talked about his workflow and organization in Lightroom’s “Library” module and how he sorts the wheat from the chaff in his image collections and collection sets. I’m not going to give away all of Matt’s secrets since I highly recommend buying an annual subscription at Kelby Training. There are quite literaly hundreds of training videos to view from some of the top photographers and instructors in the world like Joe McNally, Moose Peterson, Matt Kloskowski, Laurie Excell and Scott himself.

Back on topic, the one “key” to organizing and culling through all these images in Lightroom 2 is the use of Collection Sets and the Collections they hold. Take a look at the image above and you can see what I mean. For each place that I shoot I create a new Collection Set from the name of the location. Under each Collection Set I create two Collections, “Keepers” and “Select”. The “Keepers” are just that, images that I plan to keep and perhaps display on my blog or print later. The “Select” images are the best of the best in the “Keepers” collection. These are the images that will definitely be processed in the “Develop” module and exported for display on my website or blog or for printing.

Just how do I sort through 300 – 400 images to find the 10% “Keepers” and 2% “Select” images? Well, everyone has there own method but my workflow is fairly simple but sometimes painful. I use a three-pass system which generally takes under one hour to complete.

  1. Objective Pass – Find all the poor exposures and out-of-focus images and flag them as “Rejected”. Purge all these rejected images from Lightroom and from the primary drive where they are stored by selecting “Delete Rejected Photos” under the “Photo” menu.
  2. Subjective Pass – Find those images that are in focus, well composed and visually striking. These are my “Keepers” and my selections here are purely subjective.
  3. Professional Pass – Go through the “Keepers” to find the few images that I think are outstanding (or could be made to look outstanding with further processing). Not merely “in focus” but “tack sharp”. Not just visually striking but emotionally compelling. My criteria for this pass is simple and brutally honest. Would I want Joe McNally, Moose Peterson or William Neill to look at these images?

I’ve found that following this type of selection logic and workflow really lets me save time, disk space and heartache by culling each shoot’s images once and only once. By concentrating my “development” time on the few “Select” images, I find the results to be much more concise, professional and personally meaningful. And isn’t that we’re all looking for in our photographs anyway?

Canon 50D – Gentlemen Start Your Comparisons!

Image courtesy and copyright © Canon

Update: Amazing how different things look 24 hours later. Pretty damn smart of Nikon to wait till Canon released the 50D so they could trump it with the D90. Movies from LiveView! Who would have thought?
So, does Canon have something else up their sleeve? A real D700 competitor? The “5D MKII”? There’s no way they can call it the 7D now, or can they?

Yes, it’s official. Let the comparisons begin!

http://web.canon.jp/imaging/eosd/eos50d/index.html

  • D700 competitor? (Not Really)
  • D90 killer? (Unfortunately No)
  • 40D’s Sister or Replacement? (Canon says sister, but it sure looks like replacement to me)

Life in 1830’s Texas

Just a few more images from my trip back in time to the 1830’s in Texas. If you’re ever in the Houston area, the George Ranch Historical Park is a great place to visit and it’s just about as authentic as it gets. No rides (other than on a wagon pulled by a tractor), no fast food and no crass souvenirs. It really is like stepping back in time!

A Man’s Home is his Castle
Copyright © 2008 Jeff Lynch Photography
Shot taken with a Canon 40D , 17-40mm f/4 L at 17mm, f/8, 1/250th sec at ISO 200 on SanDisk digital film. Post processed in Adobe Lightroom 2 using the “Antique Grayscale” preset. Click on the image above for a high resolution version.

Now That’s a Smokehouse!
Copyright © 2008 Jeff Lynch Photography
Shot taken with a Canon 40D , 17-40mm f/4 L at 17mm, f/13, 1/100th sec at ISO 200 on SanDisk digital film. Post processed in Adobe Lightroom 2 using the “Antique Grayscale” preset. Click on the image above for a high resolution version.

The Front Porch
Copyright © 2008 Jeff Lynch Photography
Shot taken with a Canon 40D , 17-40mm f/4 L at 24mm, f/6.3, 1/80th sec at ISO 200 on SanDisk digital film. Post processed in Adobe Lightroom 2 using the “Punch” preset. Click on the image above for a high resolution version.

Lightroom 2 makes it very easy to tryout different “Develop” presets and to back-up if you don’t like the results. You can even combine different presets, mixing and matching until you get exactly the look you want in your image.

Hard Working Man

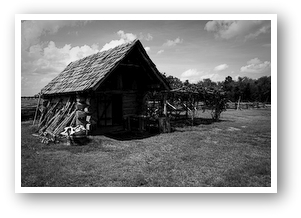
Here’s another shot taken during my little stroll around the George Ranch Historical Park, one of the oldest Texas homesteads settled in 1824 by Henry and Nancy Jones as part of Stephen F. Austin’s first colony.

As I was walking around the 1830’s homestead site, I met a man sitting on the “dog-trot” of his log cabin, carving a black powder loading “measure” from the tip of a bull’s horn. If I remember his words correctly, it seems that his brother had borrowed his flint-lock rifle, measuring funnel and black-powder and somehow had lost the measuring funnel. I could tell from his voice that carving a new one was going to be a long slow process, especially in the heat and humidity of an East Texas summer day.

Hard Working Man

Hard Working Man
Copyright © 2008 Jeff Lynch Photography
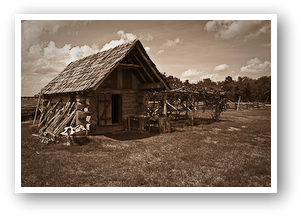
Shot taken with a Canon 40D , 17-40mm f/4 L at 40mm, f/5.6, 1/60th sec at ISO 200 on SanDisk digital film. Post processed in Adobe Lightroom 2 using the “Punch” preset. Click on the image above for a high resolution version.

I sat a spell and listened while he talked about his homestead, the fields he had under plow, the new smoke-house he was fixing to build and about the new shotgun he was looking to buy. He even let me handle his flint-lock rifle and get a good look at the fine workmanship of the wood stock and iron barrel. We had a nice chat and I asked if I might look him up the next time I was traveling this way. Being a southern gentleman, he said “Why sure. You’re welcome anytime but you should really come around for Texian Market Days in the fall. All sorts of folks will be coming around and its a whole lot of fun”.

I said that sounded like a great idea to me and thanked him for his hospitality. And as I walked down the path, I new that I’d just met one hard working southern gentleman.

Special thanks to J.R. Thomas, the 1830’s Site Lead at the George Ranch Historical Park for his time, his enthusiasm and his incredible acting ability. Staying “in character” as an 1830’s farmer when faced with a Canon 40D takes some kind of skill. By the end of our conversation I was willing to suspend disbelief and find myself transported back in time to the 1830’s. It was a great shoot and a whole lot of fun!