Stormy Weather

Stormy Weather

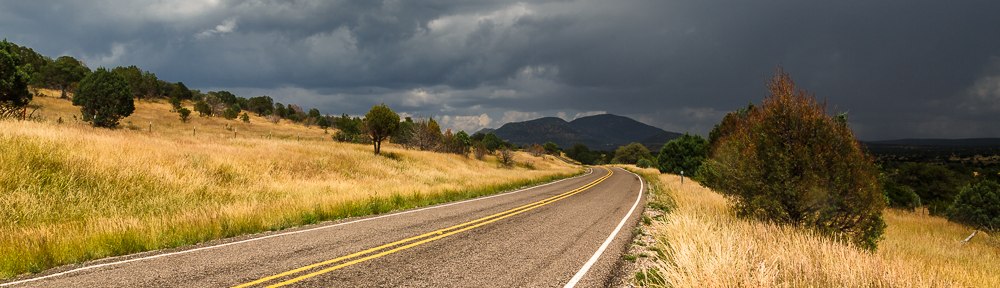
Stormy Weather – LaGrange, Texas
Copyright © 2009 Jeff Lynch Photography
Shot taken with a Canon EOS 5D Mark II set on manual (M) using an EF 24-105mm f/4L IS USM lens tripod-mounted. The exposure was taken at 28mm, f/13 for 1/8th of a second at ISO 100 using a Singh-Ray LB warming polarizer and 4-stop (soft) graduated neutral density filter. Post capture processing was done in Adobe’s Lightroom 3 Beta. Click on the image above for a larger version.

How to Get this Type of Shot: A landscape image of a storm rolling across the land.

  • The key to this shot is (obviously) the weather conditions. You’ll need to shoot on a day when a storm is moving in. I raced this storm over sixty miles before pulling ahead enough to setup and shoot.
  • A good sturdy tripod is a must in a situation like this, since any camera shake will ruin the effect. Another very important accessory is a bubble level. The human brain is very sensitive to horizontal lines and if your image is not perfectly level, people will notice. I used a bubble level for this shot but still had to do some final corrections in Lightroom.
  • Correct exposure and contrast are critical in an image like this, which is why you’ll need both a circular polarizer and a three or four-stop graduated ND filter to balance the foreground and background exposure levels. Though the storm clouds look dark, most of the sky will be much brighter than the ground and without a ND grad filter, your camera’s metering system can easily be fooled.
  • The final keys to this getting type of image are patience and safety. In Texas, a severe thunderstorm can blow in with only a few moments notice, or it may take hours to develop as conditions gradually change. Learning to wait for the right moment takes both patience and perseverance. However, safety should always be your first concern. Thunderstorms are dangerous and standing on a hillside carrying a camera and tripod makes you a definite target for lightning. Be careful and safe when shooting in bad weather. Even the best shot in the world is worth little if you’re not around to enjoy it.

Gear Friday – Let’s Talk Filters

Reposted from last May by popular demand.

If there’s one topic in photography that’s bound to stir up a heated debate it’s the selection and use of filters. No other accessory that I can think of does more to raise the blood pressure of otherwise sedate amateur and professional photographers.

For as long as I can remember there has been an ongoing debate over the use of UV filters for lens protection. The proponents say that UV filters offer good protection for the front lens element while their opponents say that a lens hood provides all the protection needed and that any piece of glass placed in front of the lens will degrade image quality.

Filters

In my opinion both sides are right and both sides are wrong. While I agree completely that any filter placed in front of the lens will degrade the image somewhat, I believe the amount of degradation depends upon the type and quality of the filter used. And there is no doubt that the UV filter does, in fact, add extra protection for the front lens element. So the question is, what kind of UV filter will provide the least possible image degradation and how much will it cost?

You can find many different brands of filters today but in my opinion, the quality and performance of B+W MRC and Heliopan SH-PMC filters make them my number one choice. Both companies use anodized brass rings to reduce thread binding and special multi-layer coatings to prevents light from being reflected off the surface of the filter.

Another favorite of mine is Singh-Ray, possibly the best filter manufacturer in the world. Singh-Ray filters are almost legendary among professional landscape photographers, with superb quality and innovative designs. Having used their filters for years all I can say is wow!

My final thoughts on filters are about cost. No matter which type of filter you decide you need (UV, Circular Polarizer, Neutral Density, ND Grad, etc.), you’re gonna lay down over $100 (USD) for a good quality filter. The very best can run you anywhere from $150 – $300 (USD) depending upon the size. You’ve already spent several thousand dollars on a camera body and a few lenses (or perhaps more than a few). Why place a $40 el-cheapo filter in front of that investment in top-notch gear and ruin your chances at capturing a great image? The man who taught me this craft over 30 years ago you to put it this way “buy the very best gear you can afford and buy it only once!”.

Sound advice in any day and age!

Water Power

I love waterfalls. There is something so innately powerful and yet so serenely beautiful about water cutting through the rock and flowing over the falls. It take thousands of years for the flow of water to erode away the rock and create a beautiful falls and perhaps it’s that unrelenting “persistence” that attracts me.

Whatever it is, waterfalls call to me and I love photographing them time and time again. It’s become somewhat of an obsession with me and I do plan to shoot as many waterfalls in Texas as possible before the Good Lord calls me home. I honestly can’t think of a better photographic project to keep the creative juices flowing, especially during the winter months.

So if you’re a native Texan and know the secret location of any waterfalls near you, drop me a line. I’ll promise you a word of sincere thanks and credit in my next book.

Water Power

Water Power – Lower McKinney Falls in Austin, Texas
Copyright © 2009 Jeff Lynch Photography
Shot taken with a Canon EOS 5D Mark II set on manual (M) using an EF 70-200mm f/4L IS USM lens tripod-mounted. The exposure was taken at 81mm, f/18 for 0.3 seconds at ISO 100. All post capture processing was done in Adobe’s Lightroom 3 Beta. Click on the image above for a larger version.

Alone at the Lake

Here’s an image I took a few months back at Buescher State Park near Smithville, Texas. This is another of those locations that I return to month after month but not for the reasons you might think. Park Road 1 runs between Buescher and Bastrop State Parks for 15 miles of up-hill and down-hill S-curves, through some of the most beautiful pine forest you’d never expect to see in central Texas. In the spring and fall it’s the prettiest Texas drive this side of the Pecos river.

Alone at the Lake

Alone at the Lake – Buescher State Park, Texas
Copyright © 2009 Jeff Lynch Photography
Shot taken with a Canon EOS 5D Mark II set on manual (M) using an EF 24-105mm f/4L IS USM lens tripod-mounted. The exposure was taken at 24mm, f/16 for 1/10th of a second at ISO 100 using a Singh-Ray warming polarizer. All post capture processing was done in Adobe’s Lightroom 3 Beta. Click on the image above for a larger version.

Gear Friday (The Late Edition) – On a Roll

Yes, I missed a few posts last week but in my defense, its been a buzy crazy January so far! So to make up for it, here’s a Gear Friday (the late edition) post on camera bags.

Think Tank Airport SecurityAt some point in your photographic career (or hobby) you’ll have more gear than you can easily carry in a traditional “over the shoulder” bag like the Domke F-2 (my personal favorite for over 30 years). And if you’re like most of us, this will leave you in a serious quandary over what size, style, material and brand bag to buy next.

There are literally hundreds of camera bags on the market today to choose from and thousands of online reviews to sort through before you can make an intelligent decision. The choices available are simply staggering and finding the “perfect” bag can become an obsession.

On a Roll
After laying out all my gear (including camera bodies, lenses, small strobes, battery packs, batteries, Pocket Wizards,  filters, gels, memory cards, snoots, gobos, umbrellas, tripods, and various cleaning stuff) in my office, it became clear that my aching back was never going to be able to lift and carry even half of this stuff without sending me back to the hospital.

So I turned to one of the best camera bag design teams in the world, the folks from Think Tank Photo. Even though I don’t fly much these days, their Airport Security V 2.0 Roller looked like just the thing to hold my gear and help me transport it without breaking my back.

Airport Security Packed

It’s pretty amazing just how much gear this bag will hold and how well balanced it feels when rolling. I’ve been able to pack all my on-location product photography gear (strobes, battery packs, batteries, Pocket Wizards, cords, umbrellas, snoots, etc.) or my usual Texas Landscape Safari kit (two bodies, four lenses, 1.4x extender, 8 different Singh-Ray filters, geo-tagging GPS, 2-way radios, first-aid kit, etc.), all in one very mobile roller.

Rolling Along
Best of all, the Think Tank Airport Security V 2.0 Roller fits perfectly in the rear of my other new roller, the 2010 Subaru Forester.

2010 Subaru Forester

The Forester is my first AWD (all-wheel drive) vehicle and the handling is unlike any other car or truck I’ve ever driven. It corners like a sports car with very stiff suspension but rides as smooth as can be. In fact, it rides better than my previous car, a 2003 Honda Accord.

But what makes the Forester really special is the rear cargo area and fold down rear seats. Unlike most SUV’s the Forester’s rear seat fold down completely flat, extending the space in the cargo area another 2-1/2 feet. For a “Strobist” this means you can store large light stands or even C-stands, booms, reflectors, soft boxes, flash heads and seamless backgrounds (53″) along with all your other photo gear, in a vehicle that gets 25 miles per gallon.

For a landscape photographer this means you can carry all your photo gear as well as a tent, sleeping bag, backpacks and supplies in an all-wheel drive vehicle with excellent ground clearance for those all-out adventures in far west Texas!

Texas Landscape Safari – Spring 2010

Texas Landscape Safari

We still have a few spots open for our Texas Landscape Safari workshop scheduled for April 24th – 27th, 2010 in the beautiful Texas Hill Country. Now that the winter rains have returned and refilled the aquifers, the rivers and streams should be running beautifully by April and provide some wonderful shots for our attendees. Each attendee will also receive an autographed copy of my Hill Country Landscapes book with detailed information on how each shot was taken.

Here’s a quick look at what we’ve scheduled for this workshop. You can click on this image to be taken directly to our Google Map for the workshop.

Texas Landscape Safari Map

We’ll be shooting at the following locations and the conditions look favorable for getting some great landscape shots in the Hill Country this spring.

  • Colorado Bend State Park – Bend, Texas
  • Inks Lake State Park – Burnet, Texas
  • Scenic Overlook – Kingsland, Texas
  • Enchanted Rock State Natural Area – Fredericksburg, Texas
  • Pedernales Falls State Park – Johnson City, Texas
  • McKinney Falls State Park – Austin, Texas

To register or for more information, please contact me via email using my Contact Me page.

Enchanted Rock

Enchanted Rock is like no other place on Earth. It’s a huge granite dome extending upwards 425 feet and from the top you can see the Texas Hill Country go on for mile after mile. It’s believed from the archaeological evidence that Native Americans visited the area as early as 11,000 years ago and local folklore speaks of spiritual powers attributed to the unique geology. According to some stories, the Native Americans hid from Anglo settlers on the top of Enchanted Rock and since they were unable to be seen from the ground below, they believed it had made them invisible.

Enchanted Rock

Enchanted Rock – Fredericksburg, Texas
Copyright © 2009 Jeff Lynch Photography
Shot taken with a Canon EOS 5D Mark II set on aperture priority (Av) using an EF 24-105mm f/4L IS USM lens tripod-mounted. The exposure was taken at 28mm, f/8 for 1/125th of a second at ISO 100 using a Singh-Ray LB warming polarizer. All post capture processing was done in Adobe’s Lightroom 3 Beta. Click on the image above for a larger version.

Enchanted Rock has been surveyed, painted and photographed extensively and in 1970 it was declared a National Landmark. The State of Texas acquired it in 1979 and opened it as a state park in 1984. It is one of the most popular hiking and camping destinations in central Texas and welcomes thousands of photographers each year. Enchanted Rock is also one of the most popular stops on the Texas Landscape Safari and I never tire of exploring it’s incredible beauty with the folks that attend my workshop.

Canon PowerShot G9/G10/G11 Neutral Density Filter

Canon PowerShot G10I’ve recently received several email messages asking how to enable and correctly use the neutral density filter built into the Canon PowerShot G9, G10 and G11 cameras recently.

Here are a few tips & tricks to get you started. Enabling the built in 3-stop ND filter is very simple:

  1. Press the Function/Set button to get to the Function menu.
  2. Use the Up arrow or Down arrow to highlight the ND icon.
  3. Use the Right or Left arrow to select ND (ND Filter On).
  4. Press the Function/Set button again to exit the menu.

If you plan to use the ND filter often you can assign it to the little “S” (shortcut) button using the Set Shortcut Button menu.

Other Tips & Tricks

  • Use a tripod to eliminate camera shake when using the built in ND filter. Read my previous post for more details.
  • You can use a Canon RS60-E3 remote cable release with the PowerShot G10 / G11 or use the Self-Timer to activate the shutter and eliminate even more camera shake.
  • Use a circular polarizer to eliminate reflections and add color depth to you images. My previous post explains how to “trick out” your G9/G10/G11 for landscape shooting.

The River Flows

The River Flows – Spring Branch, Texas
Copyright © 2009 Jeff Lynch Photography
Shot taken with a Canon Powershot G10 set on full manual mode and tripod-mounted. The exposure was taken at 30mm, f/8 for 0.6 seconds using the built-in neutral density filter at ISO 80. Post capture processing was done in Adobe’s Lightroom 3 Beta. Click on the image above for a larger version.