The Edge of Night

Edge of Night

Edge of Night – Orchard, Texas
Copyright © 2012 Jeff Lynch Photography
Shot taken with a Canon EOS 5D Mark II set on aperture (Av) priority using an EF 17-40mm f/4L USM tripod mounted. The exposure was taken at 40mm, f/13 for 1/250th of a second at ISO 100 using a Singh-Ray warming polarizer filter and 2-stop, soft, graduated neutral density filter. Post capture processing was done in Adobe’s Lightroom 4.
Click on the image above for a larger version.


Cloudscapes

I’ve really begun to enjoy posting images on Instagram and have also found many very talented young photographers in Texas that love to post their images as much as I do. One such is Rebecca (@becbaytx), a wonderful young artist from Orchard, Texas that loves to post cloudscapes and sunsets from the cotton fields surrounding this tiny town in Fort Bend County.

After viewing several of Rebecca’s gorgeous shots on Instagram I was inspired to visit the area a few weeks ago to see what I was missing and as you can see, the cloudscapes that develop over those cotton fields are a sight to see.

Cloudscape

Cloudscape – Orchard, Texas
Copyright © 2012 Jeff Lynch Photography
Shot taken with a Canon EOS 5D Mark II set on aperture (Av) priority using an EF 17-40mm f/4L USM tripod mounted. The exposure was taken at 17mm, f/14 for 1/2 second at ISO 100 using a Singh-Ray warming polarizer filter and 2-stop, soft, graduated neutral density filter. Post capture processing was done in Adobe’s Lightroom 4.
Click on the image above for a larger version.


Learning to Use a Graduated Neutral Density Filter

Everyone knows I’m an old-fashioned kind of guy when it comes to getting the correct exposure “in-camera” as opposed to “in post”. For me, post-capture processing in Lightroom 4 or Photoshop CS6 is a matter of tweaking the RAW image to help recreate what I remembered seeing when I took the shot. A graduated neutral density filter is used to balance the exposure between the background and foreground of an image. As such, it is an essential tool that every landscape photographer should learn to use early in their career (or hobby). Yes, I know you could accomplish the same thing using a photo-blending technique like HDR but it’s much easier to do this “in camera” while you’re out in the field.

Subaru Forester Sunset

Subaru Sunset – Orchard, Texas
Copyright © 2012 Jeff Lynch Photography
Shot taken with a Canon EOS 5D Mark II set on aperture (Av) priority using an EF 17-40mm f/4L USM tripod mounted. The exposure was taken at 17mm, f/14 for 1/2 second at ISO 100 using a Singh-Ray warming polarizer filter and 2-stop, soft, graduated neutral density filter. Post capture processing was done in Adobe’s Lightroom 4.
Click on the image above for a larger version.

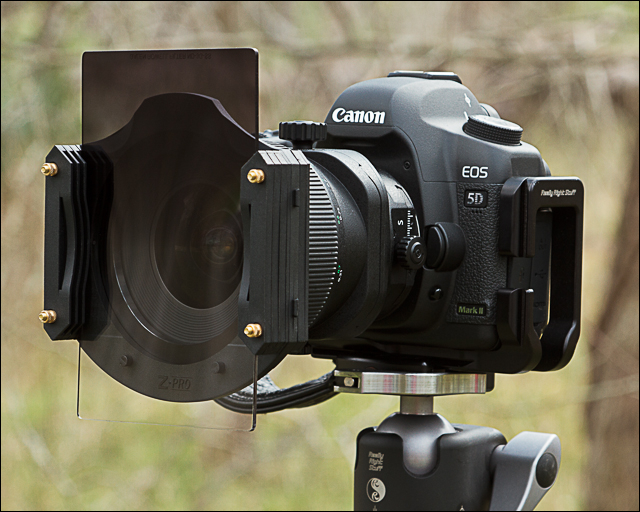
The way a graduated ND filter works is very simple, by reducing the amount of light transmitted through a portion of the filter to your camera’s sensor so that the foreground exposure more closely matches the background exposure. They are not perfectly matched mind you, just more closely. By positioning the graduated ND filter in front of the lens you can vary the amount of exposure “balancing” the filter does in each scene. You can position these filter by hand or by using a filter holder as shown in the image below.

This is my typical setup for a landscape shot with my 5D Mark II on a lightweight but sturdy tripod (Gitzo Traveller using an RRS ball-head) and a Singh-Ray graduated neutral density filter held in place by a Cokin “Z” holder, mounted on a wide angle lens. The graduated neutral density filter is generally a 2, 3 or 4-stop / soft ND grad made by Singh-Ray, a company that designs and builds the best quality photographic filters in the world.

Graduated Neutral Density Filter Setup

The purpose of the “ND Grad” filter used here was to “hold back” the bright sunset to balance foreground exposure in this late evening shot in Orchard, Texas. This allowed my DSLR to meter for the mid-tones without blowing out the bright highlights or losing all the shadow detail. The great thing about a graduated neutral density filter is that you, the photographer, have complete control over how much light the filter blocks by changing its position in the filter holder. Many photographers (myself included) prefer to hold the filter against the lens by hand, moving it to achieve exactly the effect we want.

On of my favorite landscape photographers Steve Kossack, is famous for teaching students “conscious control over colors and light” and a big part of his craft is in using the right filter at the right time. Steve’s also famous for hand-holding and moving his ND-Grad filters during the exposure so that each image is unique and one of a kind.

As Steve teaches, getting control of the colors and the light “in-camera” using a graduated neutral density is a great way to practice your craft in the field. Learning to properly use a few simple filters can extend your success and bring some much needed control to your landscape photography.

Comparing the Canon 5D Mark II, 5D Mark III and 6D

Unless you’ve been living off world for the past few years, you know that Canon has introduced several new full-frame DSLR cameras, the EOS 5D Mark II, the EOS 5D Mark III and now the brand new EOS 6D. In the coming weeks and months there will be reviews galore posted on the various industry watching blogs with in depth discussions of EOS 6D’s features and benefits. Folks that recently purchased the 5D Mark II, 7D or 5D Mark III may start to feel “buyers remorse” and “upgraders envy” over the perceived differences between their camera and the new EOS 6D. The amount of forum traffic on DPReview.com will jump as folks begin to post their rants and raves about this new camera.

To help cut through some of the rhetoric I thought I’d post a quick and dirty comparison of these three full-frame cameras based upon the information currently available. Basically, the same comparison I posted a few years ago on the new G12, G11 and G10 cameras. Let me state for the record that this comparison is from a still photographer’s perspective only. The video capabilities of these cameras are cool but not where my interests lay.

List Price:
5D2  –  $2199 (USD)
5D3  –  $3499 (USD)
6D    –  $2099 (USD)

Sensor:
5D2  –  FF (5616 x 3744) (20.6 MP)
5D3  –  FF (5760 x 3840) (22 MP)
6D    –  FF (5472 x 3648) (23.4 MP)

Processor:
5D2  –  DIGIC 4
5D3  –  DIGIC 5+
6D    –  DIGIC 5+

ISO:
5D2  –  Auto, 100 – 6400 in 1/3 stops, plus 50, 12800, 25600 as option
5D3  –  Auto, 100 – 25600 in 1/3 stops, plus 50, 51200, 102400 as option
6D    –  Auto, 100 – 25600 in 1/3 stops, plus 50, 51200, 102400 as option

Metering:
5D2  –  35 Area Eval, Center Weighted, Partial, Spot
5D3  –  63 Area Eval, Center Weighted, Partial, Spot
6D    –  63 Area Eval, Center Weighted, Partial, Spot

Auto Focus:
5D2  –  9 Point
5D3  –  61 Point (new technology)
6D    –  11 Point

Exposure Compensation:
5D2  –  ±2 EV (at 1/3 EV, 1/2 EV steps)
5D3  –  ±5 EV (at 1/3 EV, 1/2 EV steps)
6D    –  ±5 EV (at 1/3 EV, 1/2 EV steps)

Continuous Shooting:
5D2  –  3.9 fps
5D3  –  6 fps
6D    –  4.5 fps

Raw Formats:
5D2  –  RAW, sRAW1, sRAW2
5D3  –  RAW, sRAW, mRAW
6D    –  RAW, sRAW1, sRAW2

Viewfinder:
5D2  –  Pentaprism, 98% Coverage, 0.71x Mag
5D3  –  Pentaprism, 100% Coverage, 0.71x Mag
6D    –  Pentaprism, 97% Coverage, 0.71x Mag

Battery:
5D2  –  LP-E6 ($66 USD)
5D3  –  LP-E6 ($66 USD)
6D    –  LP-E6 ($66 USD)

Weight:
5D2  –  850g
5D3  –  860g
6D    –  822g

Some Initial Conclusions:
The flame wars have already started on the new EOS 6D as they do anytime Canon releases a new DSLR camera.

The comparison between the 5D Mark II and the new 5D Mark III is very easy to judge in most respects with the 5D Mark III offering some very compelling new features such as the increased resolution, the DIGIC 5+ processors, the very high 6 fps continuous frame rate, the new metering system and the brand new auto focus system. If the high ISO performance of this new 21 MP sensor is at least as good as the 5D mark II’s, then the new 5D Mark III is a sure fire winner for anyone looking for a high-end full-frame body.

The comparison between the brand new 6D and the 5D mark III is much more difficult since Canon opted to add some nice new features (such as internal GPS & wireless) but not nearly as many as they did to the more expensive 5D Mark III. The single biggest difference between these two cameras is the much more advanced auto focus and metering systems in the 5D Mark III. Only time will tell if the new 11 point AF system in the 6D is significantly better than the system found in the older 5D Mark II. I suspect the difference in price between these two models will be the deciding factor for most hobbyists.

Final Thoughts:
In the words of David duChemin, “Gear is Good, Vision is Better”. It’s not the camera that makes the photograph, it’s the person behind the camera. Don’t get all caught up in the hype over a new camera. A new camera will NOT make you a better photographer. Only YOU can do that. And it’s not done by reading the rants and raves on every new piece of gear that comes out each week. So shut down that MacBook, grab your camera and get out there and make some magic happen!