Using PTLens for Distortion Corrections

Columbus Texas

Columbus, Texas
Copyright © 2009 Jeff Lynch Photography
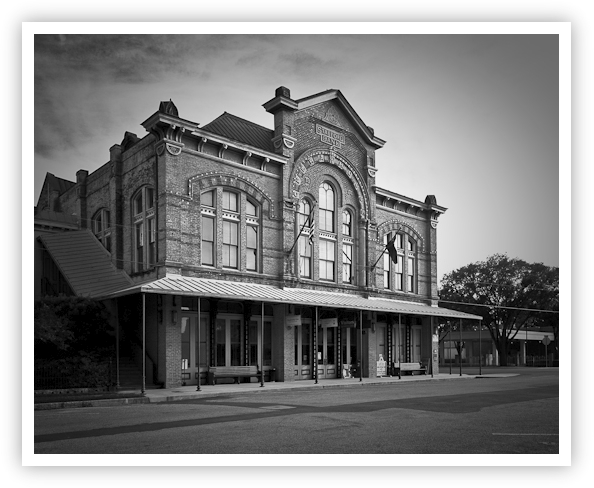
Shot taken with a Canon EOS 40D set on aperture priority (Av) using an EF-S 10-22mm f/3.5-4.5 USM tripod-mounted. The exposure was taken at 18mm, f/13 for 1/40th of a second at ISO 100 on Sandisk digital film. Post capture processing was done in Lightroom 2 and Photoshop CS4 using ePaperPress’ PTLens and Nik Software’s Silver Efex Pro plug-in filters. Click on the image above for a larger version.

If you enjoy travel, architecture or even urban photography, sooner or later you’ll run across a situation where you take a shot of a beautiful tall building but end up with an image you don’t like due to the complex distortions created by your very expensive wide-angle lens. You could use a very expensive tilt & shift lens like Canon’s new TS-E 24mm f/3.5 L II to correct the perspective distortion but what about the barrel or pincushion distortion? Luckily there is a great little tool called PTLens that can handle almost every type of complex distortion correction you’ll ever run into.
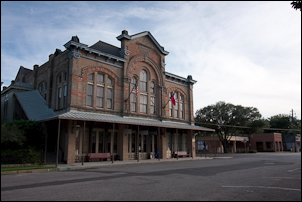
Columbus Texas Raw

Raw Image from Camera

Let’s take this image for example. I took this shot of a turn of the century bank building in Columbus, Texas using my EOS 40D and ultra-wide angle 10-22mm lens. This lens is very sharp and provides excellent contrast for most shots, but it does exhibit some pincushion distortion at the far end and like most wide angle lenses, it tends to distort the perspective when tilted up at a subject like this bank building. Correcting the perspective and pincushion distortion exhibited by this image is actually fairly simple using the process outlined below.

My first step is to develop the entire image in Lightroom 2 BEFORE CROPPING. Although this goes against my normal workflow, it’s very important not to crop the image at this point in time.
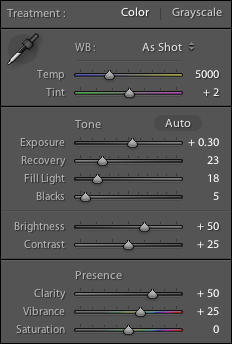
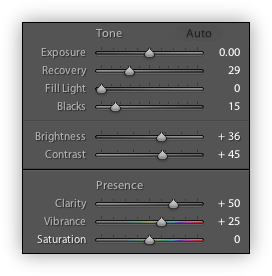
Basic Develop Settings

Basic Develop Settings

I generally work on the other Basic settings like Exposure, Recovery (very important), Blacks (also very important), Brightness and overall Contrast. I almost always crank up the Clarity (adding mid-tone contrast) and Vibrance (adding mid-tone saturation) and may play with these two settings for 20 or 30 minutes until I find a combination I like.
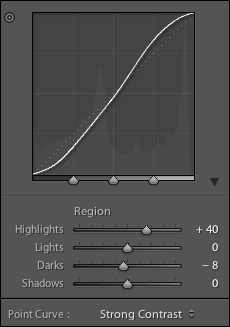
columbus04

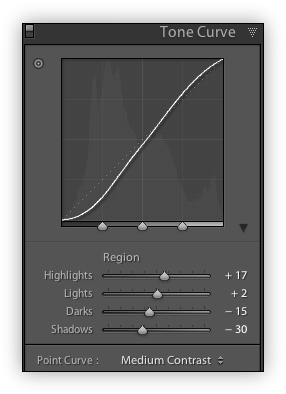
Tone Curve Adjustments

Next I begin tweaking the Tone Curve controls until I obtain the contrast desired in the image. A good rule of thumb I always try to follow is to make sure you have some deep black areas and pure white areas when you’re done adjusting the Tone Curve.

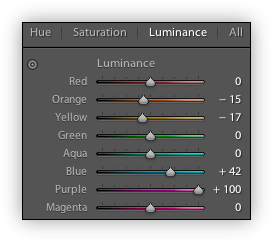
Here’s a quick trick to add some contrast to your sky. Just lower the luminance of the color blue slightly to create a much more dramatic sky without it looking fake.
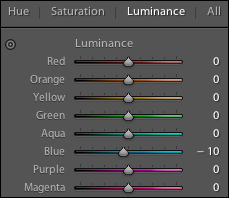
columbus05

Luminance Adjustments

To enhance the colors and really set the “mood” of the image I’ll generally spend quite some time playing around with the Hue, Saturation and Luminance settings. This is where you let your creative side go wild trying different combinations for each color until you obtain just the right look and feel.
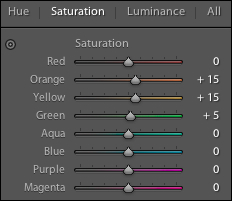
Saturation Adjustments

Saturation Adjustments

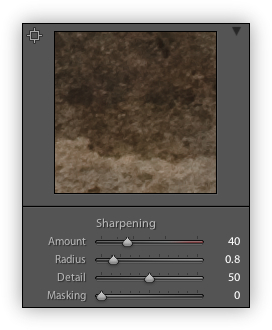
The next step is to add Sharpening and depending upon your image, the tools built into Lightroom may or may not be up to the job. In this case, the mid-tone contrast of the bricks in this image is sharp enough that I can use Lightroom to add just a bit more sharpness before exporting the image.
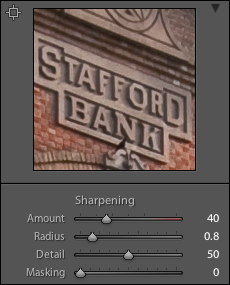
Sharpness Adjustments

Sharpness Adjustments

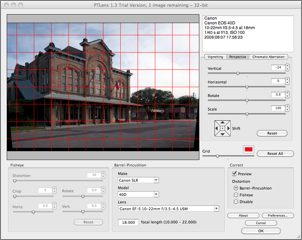
At this point, my work in Lightroom is complete and my next step is to export the image in Photoshop CS4 and then run the PTLens plug-in filter. Click on the image below to see a larger version.

PTLens in Photoshop CS4

PTLens in Photoshop CS4

The PTLens plug-in reads the EXIF data from the image and automatically corrects the barrel and pincushion distortion caused by my specific lens. To see the effect of this, you can uncheck and recheck the Preview checkbox. To correct Perspective distortion you’ll need to show the Grid and then adjust the Vertical and Horizontal controls until the vertical lines in the image are truly vertical. You’ll need to play around with this for a while until you achieve the desired results.

The next step is to crop the image to remove the black areas cause by the perspective correction as shown here.  As I said earlier in this post, it’s very important to crop your image AFTER using PTLens to correct the distortion.
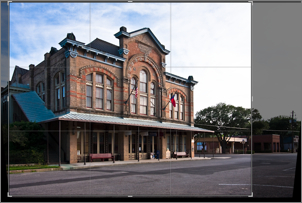
Cropping in Lightroom

Cropping in Lightroom

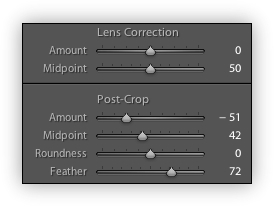
My next step is to add some darkening around the edges to highlight the center of the image. Lightroom’s Lens Correction and Post-Crop settings do a very good job of this without adding significant noise to the image. I really like how the Feather and Roundness controls allow very detailed control of the vignetting desired.

Post-Crop Adjustments

Post-Crop Adjustments

Finally a quick trip to Nik Software’s Silver Efex Pro to convert the image to black & white and we’re done.

Snow Leopard for Photographers

Apple Snow LeopardUPDATE: It’s Saturday afternoon and I’ve just completed my upgrade to Snow Leopard. It took only 45 minutes on my 13″ MBP and the upgrade went perfectly. This saved me about 8 GB of hard drive space and both startup and shutdown times are significantly faster. Lightroom 2 and Photoshop CS4 also startup faster but other than that I haven’t noticed much difference. All in all, a very nice $29 upgrade!

It’s Thursday afternoon and the release of Apple’s latest operating system, Mac OS X Snow Leopard, is just hours away. For photographers running Lightroom or Photoshop on a Mac or MacBook, this is an important upgrade for purely performance reasons.

Macworld has done a great job of compiling all their Snow Leopard articles so you can get up to speed quickly and easily. I don’t know about you but for $29 (USD) I’ll be upgrading sometime this weekend!

Black & White Conversion in Silver Efex Pro

Some shots are just meant to be converted into black & white and there’s really no better tool than Nik Software’s Silver Efex Pro plug-in for Photoshop and Lightroom. I’ve tried many different black & white conversion techniques in the past few years and nothing I’ve found works half as good as Silver Efex Pro.

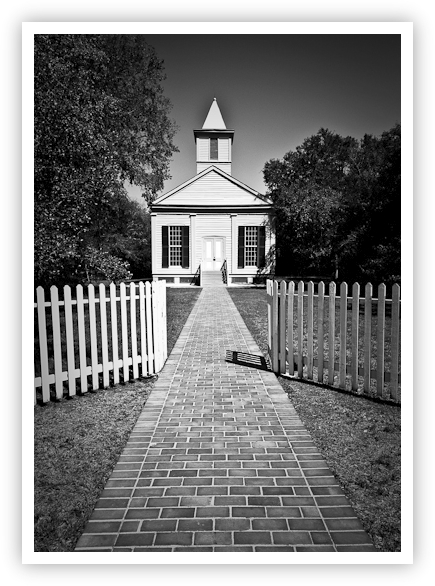
Oldest Presbyterian Church in Texas

Oldest Presbyterian Church in Texas
Copyright © 2009 Jeff Lynch Photography
Shot taken with a Canon EOS 5D Mark II set on aperture priority (Av) using an EF 24-105mm f/4 L IS USM tripod-mounted with a Singh-Ray LB Warming circular polarizer filter attached. The exposure was taken at 24mm, f/13 for 1/80th of a second at ISO 100 on Lexar Professional digital film. Post capture processing was done in Lightroom 2 and Photoshop CS4 using Nik Software’s Silver Efex Pro filter. Click on the image above for a larger version.

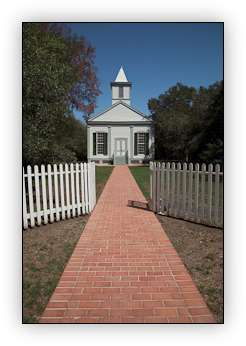
Church_Raw_BlogHere’s what the raw file looked like in Lightroom 2 before any processing was done. Not a bad color image but fairly bland given the cloudless sky and dry conditions. Converting this image into black & white added the extra contrast that was needed to give the image a little more vibrance and “pop”.
One thing to keep in mind when converting to black & white using any technique is noise. I always run Lightroom’s or Dfine’s noise reduction before the black & white conversion process. This helps eliminate the artifacts that can occur when high contrast images are converted to black & white.

Post Capture Processing in Lightroom 2

I got an email yesterday from a reader asking for a little more detail about my post capture workflow in Lightroom. It’s funny but the actual workflow I use is really determined by the image and the story I want to tell. Some images are converted from Raw to Jpeg in only a few steps (usually to add contrast) and others may take hours of trial and error like this image for example.

Mirror

Mirror – Pedernales Falls State Park, Texas
Copyright © 2009 Jeff Lynch Photography
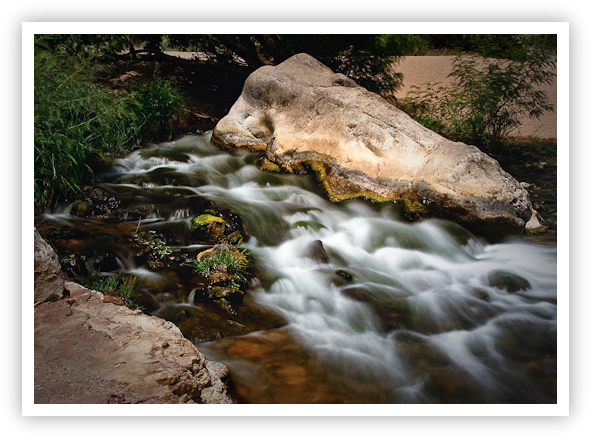
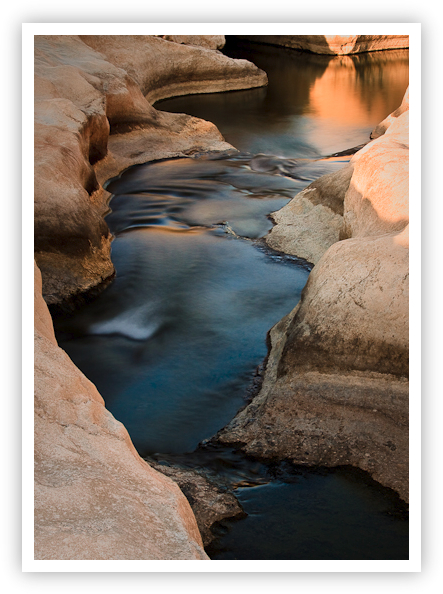
Shot taken with a Canon EOS 50D set on aperture priority (Av) using an EF 24-105mm f/4 L IS USM tripod-mounted with a Singh-Ray Vari-ND neutral density filter attached. The exposure was taken at 35mm, f/11 for 8 seconds at ISO 100 on Lexar Professional digital film. Post capture processing was done in Lightroom 2. Click on the image above for a larger version.

Original RAW ImageHere’s what the raw file looked like in Lightroom 2 before any processing was done. As you can see the long exposure (8 seconds) I used with my Singh-Ray Vari-ND neutral density filter overexposed the image significantly in the highlights. Luckily the silky smooth looking water turned out just as I had hoped,  so all in all not a bad place to begin.
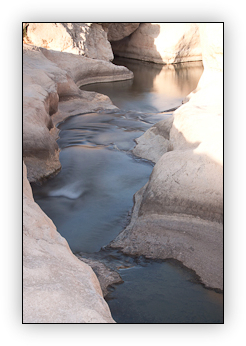
My first step is to Crop the image as shown above to eliminate the “clutter” at the top of the frame. The water now runs from the lower right hand corner diagonally to the left and then to right and (hopefully) draws the viewers eye deeper into the scene.

Camera Calibration

Camera Profile Preset

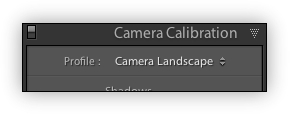
My next step is to select the Camera Profile preset I wish to use. For landscape shots this is usually Camera Landscape or Camera Portrait because of the extra saturation these two presets add.

White Balance

White Balance

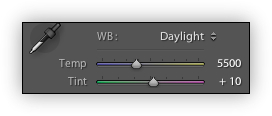
Then I set the White Balance directly rather than accepting the default. This usually adds some warmth to the image which most raw landscape images need. If there happens to be any neutral gray in my image I may use the eye-dropper to set a custom WB but most of the time Daylight or Cloudy works well.

Basic Settings

Basic Settings

After setting the White Balance I generally work on the other Basic settings like Exposure, Recovery (very important), Blacks (also very important), Brightness and overall Contrast. I almost always crank up the Clarity (adding mid-tone contrast) and Vibrance (adding mid-tone saturation) and may play with these two settings for 20 or 30 minutes until I find a combination I like.

Tone Curve

Tone Curve

Finally I begin tweaking the Tone Curve controls until I obtain the contrast desired in the image. A good rule of thumb I always try to follow is to make sure you have some deep black areas and pure white areas when you’re done adjusting the Tone Curve. It’s that Ansel Adams “Zone” training coming back to me.

HSL Settings

HSL Settings

To enhance the colors and really set the “mood” of the image I’ll generally spend quite some time playing around with the Hue, Saturation and Luminance settings. This is where you let your creative side go wild trying different combinations for each color until you obtain just the right look and feel.

RAW Sharpness Adjustment

RAW Sharpness Adjustment

The last two steps are the easiest. Every RAW image needs some Sharpening and depending upon your image, the tools built into Lightroom may or may not be up to the job. In this case, the mid-tone contrast of the rocks and water in this image is sharp enough that I can use Lightroom to add just a wee bit more before exporting it.

Post Crop Settings

Post Crop Settings

My final step is to add some darkening around the edges to highlight the center of the image. This is commonly done to emphasize the subject and draw the viewer’s eye into the image. Ligtroom’s Lens Correction and Post-Crop settings do a very good job of this without adding significant noise to the image. I really like how the Feather and Roundness controls allow very detailed control of the vignetting desired.

For an image targeted for the web, I’m done except for exporting the image to a JPEG. For an image that I’m going to print, the workflow is similar but many steps are done in Photoshop CS4 using Nik Software’s plug-in filters like Sharpener Pro, Viveza and Dfine. These Photoshop plug-ins allow me greater control and much faster speed than I can achieve in Lightroom itself.

Folks, like anything else in photography, your mileage may vary when using these techniques. Please keep in mind that each image you take is unique and will require it’s own workflow. I make no claim that this is the “best” workflow and I’m no Matt Kosklowski, Scott Kelby or Dave Cross. Feel free to comment to your heart’s content, but be kind!

Landscape Photography – Small Rapids

A couple of months ago I was hiking around the Pedernales Falls near Johnson City, Texas and happened upon this flow of water bubbling from an underground source and running back into the Pedernales river. I looked high and low but couldn’t find any sign of where the water originated from. It must have started somewhere upstream in the falls in a spot where the water flows underground before being forced back to the surface. It was an amazing set of very little rapids and makes a curious photograph to look upon.

Small Rapids

Small Rapids- Pedernales Falls, Texas
Copyright © 2009 Jeff Lynch Photography
Shot taken with a Canon EOS 40D set on aperture priority (Av) using an EF 24-105mm f/4 L IS USM tripod-mounted with a Singh-Ray Vari-ND neutral density filter attached. The exposure was taken at 28mm, f/14 for 1.6 seconds at ISO 100 on Sandisk digital film. Post capture processing was done in Lightroom 2. Click on the image above for a larger version.

Landscape Photography – Texas Rain Forest

Happy Monday morning to everyone and happy first day of school for all you Texas kids!

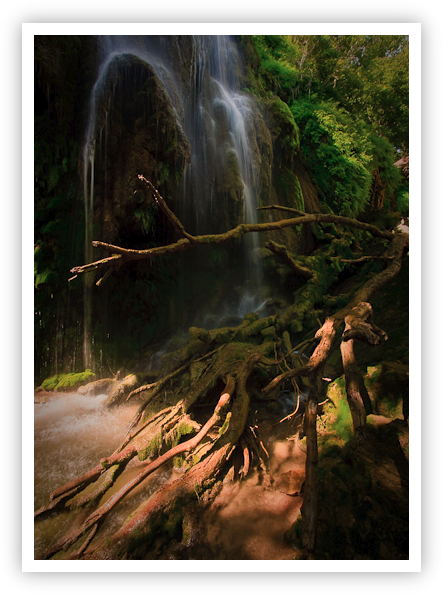
Here’s another shot I took of Gorman Falls at the Colordao Bend State Park near Bend, Texas. I look forward to visiting this wonderful location again this October. Hopefully the drought will have abated by then and Gorman Creek will be flowing freely.

Texas Rain Forest

Texas Rain Forest – Bend, Texas
Copyright © 2009 Jeff Lynch Photography
Shot taken with a Canon EOS 40D set on aperture priority (Av) using an EF-S 10-22mm f/3.5-4.5 USM tripod-mounted with a Singh-Ray Vari-ND neutral density filter attached. The exposure was taken at 10mm, f/13 for 1/6th of a second at ISO 100 on Sandisk digital film. Post capture processing was done in Lightroom 2. Click on the image above for a larger version.

Landscape Photography – The Old West

Here’s another shot I took last weekend in Goliad, Texas of the Presidio La Bahia. Walking around this old mission and fort was like stepping on the set of a John Wayne movie. The old west at it’s best!

Have a great weekend folks!

Presidio La Bahía

Presidio La Bahia – Goliad, Texas
Copyright © 2009 Jeff Lynch Photography
Shot taken with a Canon EOS 5D Mark II set on aperture priority (Av) using an EF 24-105mm f/4 L IS USM tripod-mounted with a Singh-Ray LB warming polarizer attached. The exposure was taken at 24mm, f/13 for 1/40th of a second at ISO 100 on Lexar Professional digital film. Post capture processing was done in Lightroom 2. Click on the image above for a larger version.

Comparing the Canon G10 and G11

G10G11

As most of you know by now, Canon has introduced a new “G” series model, the PowerShot G11 to replace their flagship model the G10. In the coming days there will be reviews galore posted on the various industry watching blogs with in depth discussions of this new model’s features and benefits. Folks that recently purchased the G10 will start to feel “buyers remorse” and “upgraders envy” over the perceived differences between their G10 and the new G11. The amount of forum traffic on DPReview.com will jump as folks begin to post their rants and raves about this new camera.

To help cut through some of the rhetoric I thought I’d post a quick and dirty comparison of the G10 and G11 cameras based upon the information currently available. Right off the bat let me state that this comparison is from a still photographer’s perspective only. The video capabilities of both cameras are cool but not my cup of tea.

Sensor:
According to Canon, the “i-Contrast” system in the PowerShot G10 has been enhanced in the G11 to deliver better coverage from low light shadow details to highlights with minimized blow out. This sounds very similar to their “highlight tone priority” setting found in Canon’s DSLR line. Canon also claims that the DIGIC 4 processor carries out image processing in-camera and in combination with the high-sensitivity 10.0 Megapixel sensor to deliver exceptional performance in all lighting conditions up to ISO 3200. They state that they have “improved the signal-to-noise ratio by around two stops when compared to the G10 camera”.

ISO:
G10 – AUTO, High ISO Auto, 80, 100, 200, 400, 800, 1600
G11 – AUTO, 80, 100, 200, 400, 800, 1600, 3200

Pixels:
G10 – 14.7 MP
G11 – 10.0 MP

Processor: Same (DIGIC 4)
Lens: Same
Focusing: Same
Exposure Control: Same
Shutter: Same
White Balance: Same
Viewfinder: Same

LCD:
G10 – 3.0″ PureColor LCD II, 461,000 dots
G11 – 2.8″ Vari-Angle LCD II, 461,000 dots

Image Size:
G10 – 4416 x 3312
G11 – 3648 x 2736

Interface:
G10 – A/V Out
G11 – HDMI, A/V Out

Flash Sync:
G10 – 1/500th
G11 – 1/2000th

Continuous Shooting:
G10 – Approx. 1.3 shots/second
G11 – Approx. 1.1 shots/second

Sound memo:
G10 – Up to 60 sec per image
G11 – Missing ???

Conclusions:
If all this preliminary information is correct then there are really two primary differences between these two excellent cameras; the low light / high ISO performance and the articulating LCD screen. I certainly hope the low light / high ISO performance (lower noise) of the new G11 is better than the G10 which is really poor. Especially since this improved performance comes at the expense of image resolution (which I really like for landscape and nature photography).

To be honest, I’m having trouble understanding the benefits of an articulating LCD screen, especially in outdoor conditions. Will this screen be easier to see in bright sunlight if it’s tilted somehow? Does this feature make composition easier? Is this feature aimed at videographers using the G11? Personally I’d have preferred a higher resolution 3″ LCD like that found on the new EOS 50D and 5D Mark II, which is much easier to see outdoors.

Some Final Thoughts:
I think the G9/G10/G11 are superb cameras capable of delivering exception results under the right conditions. I do think that Canon has done the right thing in concentrating on improving the sensor in these cameras, rather than on just adding more megapixels with each new model. As a nature and landscape photographer I think the G10 fits my needs very well and I personally have no use for the G11’s articulating LCD, especially since it’s smaller that the LCD on the G10. I just don’t see many G10 owners rushing out to buy a G11 but for new owners its a pretty impressive point & shoot camera.

Here’s another good review from photographer Bill Lockhart: Canon Announces Powershot G11