More Canon G10 Nature Photography

Here’s another landscape shot taken a few weeks ago using the Canon G10 mounted on a light-weight tripod. Don’t let anyone tell you “point & shoot” cameras are for tourists and not serious photographers. The resolution and detail captured by this little camera is nothing less than outstanding. But don’t take my word for it. Click on the image blow for a larger version and pixel peep to your hearts content.

Devils Waterhole Falls

Devils Waterhole Falls – Inks Lake State Park, Texas
Copyright © 2009 Jeff Lynch Photography
Shot taken with a Canon Powershot G10 set on aperture priority (Av) and tripod-mounted. The exposure was taken at 11mm, f/7.1 for 1/3rd second using the built-in neutral density filter at ISO 80 on Lexar Professional digital film. Post capture processing was done in Adobe’s Lightroom 2. Click on the image above for a larger version.

It’s Air Show Time Again!

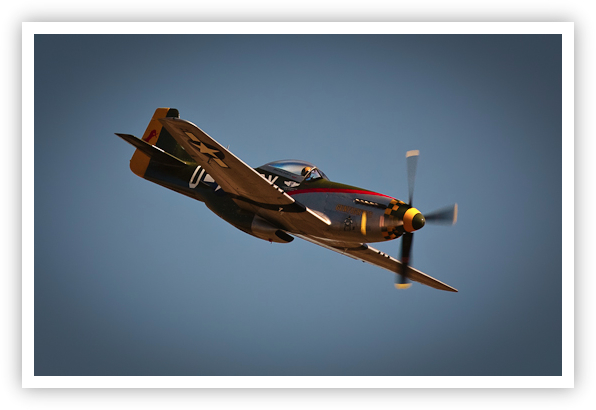
It’s that time of year again and we’re praying for the rain to stop before sunrise on Saturday. This year is a special treat for local photographers at the Wings Over Houston air show since they’ve finally set aside space for shooters and arranged for some flight line passes to be available. I guess my bitching griping must have worked!

Mustang - Wings Over Houston 2008

Mustang – Wings Over Houston 2008
Copyright © 2008 Jeff Lynch Photography
Shot taken with a Canon EOS 40D set on shutter priority (Tv) using an EF 300mm f/4L IS USM lens hand-held. The exposure was taken at 300m, f/6.7 for 1/500th of a second using a B&W circular polarizer at ISO 100 on Sandisk digital film. Post capture processing was done in Adobe’s Lightroom 3 Beta. Click on the image above for a larger version.

Mountains in the Distance

Here’s another shot taken last week at the Enchanted Rock State Natural Area near Fredericksburg, Texas. The early morning sun had risen over the mountains in the distance just enough to to highlight the clouds and provide some wonderful contrast to the rocks and trees. Enjoy!

Mountain in the Distance

Early Morning Climb – Enchanted Rock State Natural Area, Texas
Copyright © 2009 Jeff Lynch Photography
Shot taken with a Canon EOS 5D Mark II set on aperture priority (Av) using an EF 24-105mm f/4L IS USM lens tripod-mounted. The exposure was taken at 245m, f/8 for 1/30th of a second using a Singh-Ray warming polarizer and 4-stop graduated neutral density filter at ISO 100 on Lexar Professional digital film. Post capture processing was done in Adobe’s Lightroom 2. Click on the image above for a larger version.

Running Water Shot with Canon’s G10

Here’s another abstract landscape shot with Canon’s Powershot G10 using its built-in 3-stop neutral density filter. Landscape photographers have long known the creative potential a neutral density filter can offer when shooting flowing water using a long exposure. Being able to take advantage of this in a point & shoot camera is somewhat unique and really sets the Canon G9, G10 & G11 apart from the competition.

Swirl - Guadalupe River, Texas

Swirl – Guadalupe River State Park, Texas
Copyright © 2009 Jeff Lynch Photography
Shot taken with a Canon Powershot G10 set on aperture priority (Av) and tripod-mounted. The exposure was taken at 30mm, f/8 for 1/2 second using the built-in neutral density filter at ISO 80 on Lexar Professional digital film. Post capture processing was done in Adobe’s Lightroom 2. Click on the image above for a larger version.

Lightroom 2 Poster Template Tutorial

I received an email last week from a photographer in Michigan who was curious how I added the white border and text to my prints (posters actually). There are many ways to do this in Photoshop (and Scott Kelby’s books detail most of these methods) but I prefer to let Lightroom 2 handle the heavy lifting most of the time.
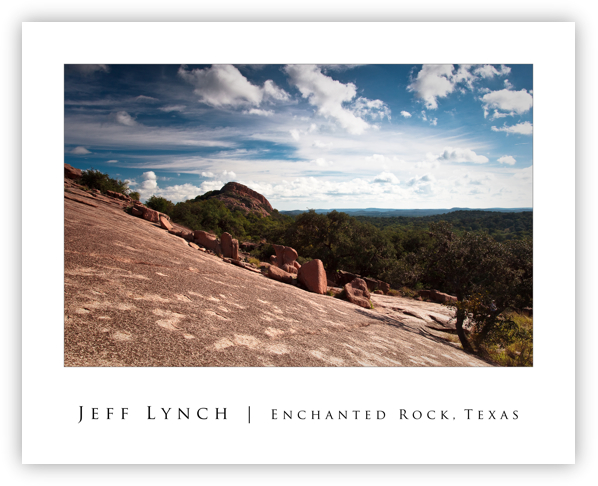
Enchanted Rock, Texas 20 x 16 Poster

The first step in creating this type of Print Template is to setup a custom Page Size in Lightroom 2 such as the 20″ x 16″ page shown above. I chose 20″ x 16″ since its a common frame size available and the white borders used result in a very viewable 17″ x 11″ image size.

Once you’ve set your page size you’ll need to change the Image Settings as shown below to add a medium gray Stroke Border around your image giving it the appearance of being matted.
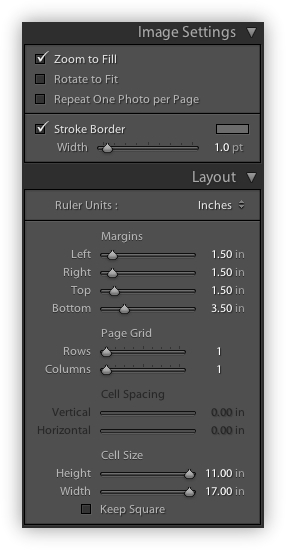
Lightroom Print Layout Settings

Lightroom Image Settings & Layout

To create a poster Layout, you’ll need to change the Margins to add the white border and set the Page Grid to 1 row and 1 column. This should result in a Cell Size exactly 17″ wide and 11″ high.

I use Lightroom 2’s Overlay settings to add a custom Identity Plate to the white border below the image as shown below.
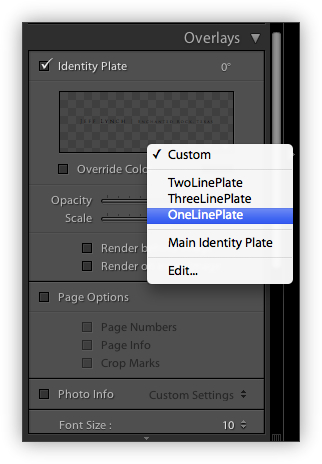
Lightroom's Overlay Settings

Lightroom's Overlay Settings

This is where things can get a little sticky so I’ve created three custom Identity Plate templates including a one-line, two-line and three-line version to add and modify as needed.
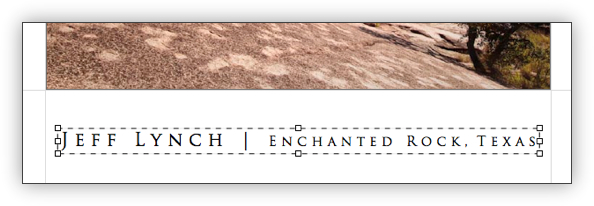
Lightroom's Identity Plate

Centering Lightroom's Identity Plate

Centering the Identity Plate in the bottom white border can be a little tricky in Lightroom 2 and this feature has been improved only slightly in the Lightroom 3 beta.

The best way I’ve found to do this is enlarge it to 100% and then center it with the edges of your image, moving it up and down, little by little until it looks about right. Then reduce to to somewhere between 60% – 75% until the text is smaller than the image width as shown above.

Editing an Identity Plate

Editing an Identity Plate

A few tricks to make this look really nice:

  • Use an all-caps font like Trajan Pro for a really elegant look.
  • Add a blank space between each letter in a word and three blank spaces between each word.
  • Create a multi-line identity plate by adding pressing Option+Return to start a new line.
  • Use different font sizes for different parts of the identity plate.

Once you’ve finished this you can save this as a Print Template to use again and again.

New WordPress Theme for Mobile Visitors

WordPress has launched another great theme designed for readers accessing Serious Amateur Photography with an iPhone or iPod Touch. Now mobile visitors will be greeted by the updated WPtouch theme offering easy access to posts, pages, and archives. They’ll also get fancy AJAX commenting and post loading.

When mobile visitors click on a post they be able to view the entire post and the images exactly as I’ve uploaded them. Folks using Safari can give this a try on their iMacs or MacBooks by changing the User Agent setting under the Develop menu to Mobile Safari 3.0.

WordPress on the iPhone

Landscape Photography – The View from the Top

Here’s a shot taken earlier this week during the Texas Landscape Safari at Enchanted Rock State Natural Area near Fredericksburg, Texas. Enchanted Rock is a huge granite dome that rises 425 feet above the ground, or about 1800 feet above sea level. This incredibly huge “batholith” (Google it) covers 640 acres making it one of the largest rock formations uncovered by erosion in the United States. And yes, the climb to the top is as steep as it looks but well worth the effort!

Early Morning Climb

Early Morning Climb – Enchanted Rock State Natural Area, Texas
Copyright © 2009 Jeff Lynch Photography
Shot taken with a Canon EOS 5D Mark II set on aperture priority (Av) using an EF 24-105mm f/4L IS USM lens tripod-mounted. The exposure was taken at 28mm, f/13 for 1/15th of a second using a Singh-Ray warming polarizer and 4-stop graduated neutral density filter at ISO 100 on Lexar Professional digital film. Post capture processing was done in Adobe’s Lightroom 2. Click on the image above for a larger version.

Shooting Waterfalls with Canon’s G10

One incredibly useful feature often overlooked in Canon’s G10 and G11 cameras is the built-in 3-stop neutral density filter. Landscape photographers know the creative potential a neutral density filter can offer when shooting flowing water and now that creative potential can be found in a point & shoot camera.

I took this shot last Saturday evening just before sunset with my G10 mounted on a light-weight Gitzo tripod. Using an aperture of f/8 and the internal neutral density filter allowed me to capture this image at 1/3rd of a second, which was just slow enough to create a wonderful smoothing effect in the flowing water. At ISO 80, the G10’s 14.7 MP sensor offers very acceptable noise which Nik Software’s Dfine had no trouble eliminating in post.

As a backup to my Canon 5D Mark II, the Powershot G10 continues to amaze me with it’s image quality, versatility and ease of use. Not bad for less than $500 (USD). I can’t wait to get my hands on the new G11 to test!

Flow

Flow – Pedernales Falls near Johnson City, Texas
Copyright © 2009 Jeff Lynch Photography
Shot taken with a Canon Powershot G10 set on aperture priority (Av) and tripod-mounted. The exposure was taken at 30mm, f/8 for 1/3rd of a second using the built-in neutral density filter at ISO 80 on Lexar Professional digital film. Post capture processing was done in Adobe’s Lightroom 2. Click on the image above for a larger version.