At the end of each year I try to leave my readers with a little something extra, to entice them to return in the new year to share my passion for nature photography. This year I want to discuss about a topic that has become more and more important to nature photographers that visit our southern border; Photographic Safety! To start off, I’d like to relate an incident from last year that reaffirmed my commitment to broach this sensitive but vital topic with my friends, readers and fellow photographers.

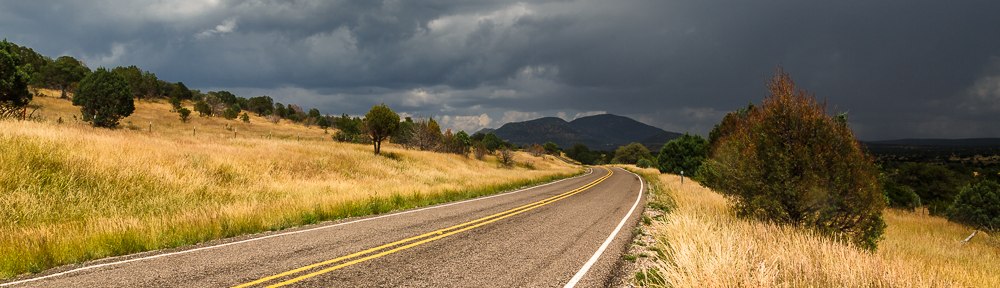
Rugged Landscape – Big Bend National Park, Texas
Copyright © 2011 Jeff Lynch Photography
Shot taken with a Canon EOS 5D Mark II set on aperture (Av) priority using an EF 17-40mm f/4L USM lens tripod mounted. The exposure was taken at 25mm, f/14 for 1/80th of a second at ISO 100 with a Singh-Ray warming polarizer filter. Post capture processing was done in Adobe’s Lightroom 3.
Click on the image above for a larger version.
As many of you know I love to travel the back-country roads of Texas looking for the best locations and light for landscape, nature and wildlife photography. Some of my favorite spots are several hundred of miles from Houston, scattered through the thousands of miles of Texas’ back-country roads and some, like Brazos Bend State Park are just a few miles from my home in Sugar Land. On a late afternoon hike last December I was approached by a group of wildlife enthusiasts, each carrying several thousand dollars worth of photographic gear, just as I was that afternoon. We stopped and chatted for a few minutes before each of us went our separate ways to capture a few last shots before the sun set in the southwest. Just a normal encounter between fellow photographers in one of the region’s finest state parks for photographing birds (cool) and alligators (yuck).
Threat Assessment
As we all began to walk off I noticed another group of four young men with P&S cameras standing alongside one of the trails and speaking with each other in muted tones. I honestly didn’t give it a second thought until they broke into two pairs and began to follow myself and the other photographers as we headed back to our vehicles. Two of the young men approached me and quietly asked how much a camera & lens like the one I was holding would cost. Since it was now fairly dark, I just kept on walking toward my vehicle and laid the camera & telephoto lens in the front seat while standing there with my rather large mono-pod looking very much like a club. I quietly reached up to the two-way radio attached to my pack and “chirped” the mic button a few times to gauge their reaction. As I had hoped, they heard the “chirp” and assumed I was a Park Ranger, TPWD officer or off-duty cop and quickly turned and walked off without waiting for me to answer.
I started my vehicle, put my lights and fog lamps on high-beam and drove over to the other photographers’ cars in time to see the four men now standing off to the side of the parking lot, light up like four deer in the headlights. They quickly turned and fled to their own car parked at the other end of the lake. I sat there with my lights illuminating the scene while the other photographers put their gear and long lenses away safely. Once the situation seemed secure I explained to them that it was my belief that the four young men were looking to steal my gear and theirs as well. The other photographers seemed a bit skeptical until I explained how the four men had split up and followed us separately back to our vehicles. I also explained that walking around with $20,000 – $30,000 of brand new cameras and shiny white lenses could attract the wrong kind of attention, even in a relatively safe place like a state park.
Concealment and Preparedness
I’ve blogged before about Packing for Landscape Photography but I want to emphasize that this post is about your personal safety and protection and I’ll be quite frank with everyone, the only person that can guaranty your safety is you!
As a husband and father of four daughters I sincerely wish this wasn’t the case, but we live in a world where some folks have decided (for whatever reason) that it’s acceptable behavior to steal someone else’s possessions and even assault them in the process. I’ve hiked, camped, snowshoed and canoed in North America all my adult life and have never run into an animal in the wild that wasn’t more afraid of me than I was of it, including bears, wolves, coyotes, elk, hogs and even a moose. The only animal that consistently preys on its own kind is “man”.
So, I have a few hard & fast “safety” rules when I’m out photographing nature into the evening hours.
- I never (ever) open the back of my SUV and put together my shooting outfit (camera, lens, tripod, etc.) in the field. Nothing attracts the wrong kind of attention more than letting the whole world see all your shiny and expensive photo gear while you rummage through it for 20 minutes before beginning your hike. I generally put together my kit for the day before leaving my home and rarely put it away before returning home at night. Having your gear ready in advance offers you opportunities to shoot that you might miss otherwise and allows you to quickly and quietly exit your vehicle without attracting unwanted attention.
")
- I never store my camera, lenses, filters, etc. in an easily recognizable camera bag while I’m out in the field. Yes, I love the “Think Tank Rollers” for commercial work but nothing says ROB ME more than a large camera bag or backpack. In fact my current “camera bag” of choice is the Filson Sportsman’s Bag shown here. It is only slightly larger than my old Domke F2 canvas bag but it holds a whole lot more gear in its main compartment and two full-size, front & back pockets as you can see in this image.

- I never hike without a Motorola MR350R two-way radio strapped to my belt or backpack, especially when alone. I have one with me at all times and another on the dashboard of my vehicle on top of a note that says quite simply “If I’m not back by 10:00PM, call me on this channel because I’m hurt and need help”. In most state parks here in Texas, the Park Ranger or Superintendent will drive the park before shutting the gate to all but folks camping in the park for the night. Most parks close at 10:00PM so my note tells the park official two things when he comes across my vehicle during his nightly “sweep”; I’m not camping in the park and I may need assistance. The radio allows the park official to contact me to determine my condition and location should a rescue be needed. A set of two radios costs less than $50 (USD) and is the cheapest insurance you can find when trouble occurs.

- Another piece of technology I never leave home without is my trusty GPS with a fully-charged, high-capacity, lithium battery. In fact, my good friend and trusty guide Jack, has come up with a way to use an overcharged and partially discharged (non-standard) battery in his Garmin GPS to get over 10 hrs of continuous use. Today I use the Garmin GPSMAP 62S model since it has almost 2 GB of memory to hold my custom TOPO maps and previous routes. I’ve used the less-expensive Garmin Dakota and Oregon units in the past but found their range, reliability and battery life to be a potentially life-threatening issue. When you’re hiking in the Texas outback the last thing you need is a GPS that can’t find enough satellites for a proper fix. The high-end Garmin units have served Jack and I without fail during our recent expeditions and in one case, probably saved us from a 750 foot climb in the dark.

- The final piece of gear that I carry is a Kimber 1911 semi-automatic pistol, that I pray, never (ever) has to be used to defend my life. I’m quite sure some of you reading this will stop right here in shock, thinking something like “how on Earth could a good Christian like Jeff carry a gun?” and “could he really take another life to save his own?”.
Like all major choices in life, the decision to train with, carry and potentially use a firearm is a very personal and difficult decision to make. Only a small percentage of our country’s population owns a firearm (the percentage is much higher in states like Texas & Montana) and an even smaller percentage of firearm owners decide to apply for a “concealed handgun license” and carry a firearm when they feel it’s necessary.
I grew up shooting pistols, rifles and shotguns and have owned a handgun on and off for the past 25 years. Although I’m comfortable around handguns my decision to properly train with and carry a firearm in the field was the result of my age and circumstances as well as where I live and photograph. A friend and fellow nature photographer that pens the blog Montana Outdoors, once posted a picture of his S&W .357 magnum pistol next to a huge paw print from a wolf walking on the same trail. While he carries for a different reason, we both understand that in the field, you are “responsible” for your own safety and protection and I doubt he hikes without his firearm.
Texas is a big place and many of the best locations for nature photography are in areas bordering Mexico. Now I’ve traveled along the Mexican border and into Mexican border towns for twenty years without feeling the least bit uncomfortable but the drug violence of the past few years has turned much of the country’s southern border into a “no mans land” reminiscent of the 1870’s. I’m not making any statements here about cause & effect or about border security policy. I’m just saying it’s a fact that there’s just too much land for the “authorities” to cover and any nature photographer venturing into the border area had better be aware of the risks.
We’ve had less trouble here in Texas than our neighbors in New Mexico and Arizona but the days of pitching a tent along a deserted stretch of the Rio Grande and waiting for a beautiful sunrise to photograph are probably over for time being. Today the watchwords for nature photographers are “situational awareness”, “threat assessment” and “evasion” just as much as they are “camera”, “lens” and “tripod”. These days it’s a good idea to plan your hikes to return before dark, be mindful of exactly where you are in relation to the border and be prepared with an emergency egress (route) should the worst occur. If possible, never hike alone and always leave an itinerary with someone at your base camp or hotel.
More than anything else, don’t take your personal safety in the field for granted. We still live in a world where the wolves will eat the unwary rabbit. Be aware, be careful and be safe and bring back some great photographs to share with us all.

 There have been hundreds of articles written (including my own) about Canon’s groundbreaking (APS-C sensor) DSLR camera the EOS 7D, so I won’t bore you with yet another review here. However, I do want to point out a few key features of this camera as they relate to a favorite topic of mine; (relatively) “affordable wildlife photography”.
 For years I shot with Canon’s EF 300mm f/4L IS USM + EF 1.4x Extender as my primary bird photography setup and rented Canon’s 500mm or 600mm lenses with a Wimberley gimbal head when I needed more “reach” which was often. Believe me, for bird photography you always need more “reach”.
 Early reviews of this lens complain about an apparent lack of contrast inherent in the (DO) diffraction optics’ design. All I can say is “hogwash”.


