Camera Support Systems

If you’ve read my previous posts about tripods, then you understand that high quality tripods are sold “bare”, without anything to attach them to your camera. This is where the ballhead and quick-release clamp come in. Good quality ballheads are designed to support heavy loads, move smoothly but lock solidly. Ballheads are easier to use and much more stable than the old fashioned “pan & tilt” tripod heads. Aiming and leveling can be accomplished as one motion, and solid lockup is accomplished with a tightening of only one control. The best designed ballheads also offer variable tension that makes them easy to control. Tripods with ballheads are much easier to pack and carry than pan & tilt heads since they have no long handles to get in the way.

Ball_Head_Blog

But the ballhead is only half the story. The other half is the clamp system which is used to attach your camera to the ballhead. Mounting your camera using the standard ¼”‑20 screw is far too slow and insecure. Instead, many manufacturers adopted the “Arca-Swiss” standard which uses an open-ended dovetail channel with compressing side jaws that grip the mounting plate or bracket attached to the camera. This unique setup provides a quick and easy clamping system that is very solid and secure.

When used in conjunction with an L-Plate designed for your specific camera the quick-release clamp system allows the landscape photographer to quickly switch between shooting horizontally and vertically as shown in the images below.
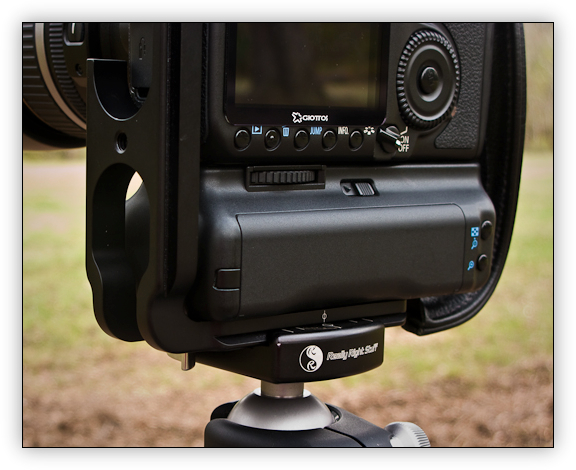
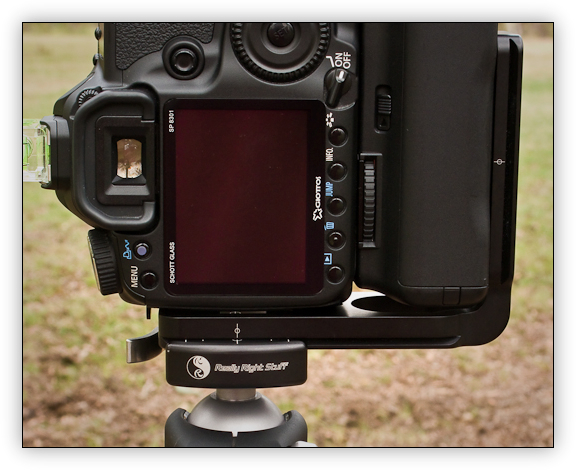
Quick Release Clamp & Camera L-Plate

Quick Release Clamp with L-Plate

Really Right Stuff
In my opinion the best designed and highest quality ballheads, clamps and camera plates are made by Really Right Stuff, a great little company in California owned and operated by Joe Johnson. The folks at RRS are incredible to work with and their attention to detail in the design and manufacturing of camera support systems is second to none. That’s why you’ll see nine out of ten professionals using RRS gear including guys like Joe McNally, Moose Peterson and Scott Kelby.

The advice I give to any serious amateur is to buy the best tripod and ballhead you can possibly afford and buy them only once.  Really Right Stuff (gotta love that name) gear is expensive folks but worth every single penny. The workmanship is something I’ve only seen in medical devices before and the various parts fit together perfectly, time after time.

I’ve put an RRS L-Plate on every camera I currently shoot with from my 5D mark III to my G10 and can lock them into my BH-40 LR / Gitzo Traveller in just seconds to capture that perfect light at the end of the day. I honestly can’t imagine using any other brand than Really Right Stuff.

Instagram

Workshop Preparation Post #4: Use a Ball Head

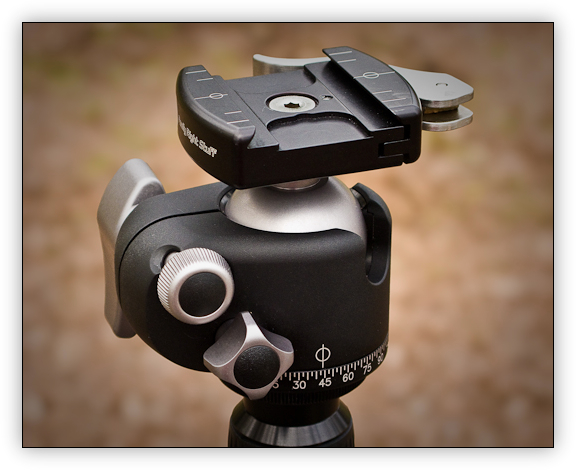
When you buy a good quality tripod, you get just the tripod legs (even though it’s called a tripod). A good quality ballhead can make all the difference in capturing great looking landscape or nature images. A ballhead will let you quickly and easily adjust where your camera is pointed and how it is oriented (horizontal or vertical). Its also the most secure means to hold that expensive DSLR and lens you’ve just paid good money for.

rrs_bh40_blog

The folks at Really Right Stuff make the best ballheads and arca-swiss style clamps I’ve ever used and the unit shown above is their BH-40 LR (BH-40 head with B2-40 LR clamp). It fits perfectly on my Gitzo tripod legs and keeps my Canon 5D Mark III secure and stable when taking landscape shots. It’s a great ballhead for basic pano shots as well.

Instagram

Learning to Use a Graduated Neutral Density Filter

Everyone knows I’m an old-fashioned kind of guy when it comes to getting the correct exposure “in-camera” as opposed to “in post”. For me, post-capture processing in Lightroom 4 or Photoshop CS6 is a matter of tweaking the RAW image to help recreate what I remembered seeing when I took the shot. A graduated neutral density filter is used to balance the exposure between the background and foreground of an image. As such, it is an essential tool that every landscape photographer should learn to use early in their career (or hobby). Yes, I know you could accomplish the same thing using a photo-blending technique like HDR but it’s much easier to do this “in camera” while you’re out in the field.

Subaru Forester Sunset

Subaru Sunset – Orchard, Texas
Copyright © 2012 Jeff Lynch Photography
Shot taken with a Canon EOS 5D Mark II set on aperture (Av) priority using an EF 17-40mm f/4L USM tripod mounted. The exposure was taken at 17mm, f/14 for 1/2 second at ISO 100 using a Singh-Ray warming polarizer filter and 2-stop, soft, graduated neutral density filter. Post capture processing was done in Adobe’s Lightroom 4.
Click on the image above for a larger version.

The way a graduated ND filter works is very simple, by reducing the amount of light transmitted through a portion of the filter to your camera’s sensor so that the foreground exposure more closely matches the background exposure. They are not perfectly matched mind you, just more closely. By positioning the graduated ND filter in front of the lens you can vary the amount of exposure “balancing” the filter does in each scene. You can position these filter by hand or by using a filter holder as shown in the image below.

This is my typical setup for a landscape shot with my 5D Mark II on a lightweight but sturdy tripod (Gitzo Traveller using an RRS ball-head) and a Singh-Ray graduated neutral density filter held in place by a Cokin “Z” holder, mounted on a wide angle lens. The graduated neutral density filter is generally a 2, 3 or 4-stop / soft ND grad made by Singh-Ray, a company that designs and builds the best quality photographic filters in the world.

Graduated Neutral Density Filter Setup

The purpose of the “ND Grad” filter used here was to “hold back” the bright sunset to balance foreground exposure in this late evening shot in Orchard, Texas. This allowed my DSLR to meter for the mid-tones without blowing out the bright highlights or losing all the shadow detail. The great thing about a graduated neutral density filter is that you, the photographer, have complete control over how much light the filter blocks by changing its position in the filter holder. Many photographers (myself included) prefer to hold the filter against the lens by hand, moving it to achieve exactly the effect we want.

On of my favorite landscape photographers Steve Kossack, is famous for teaching students “conscious control over colors and light” and a big part of his craft is in using the right filter at the right time. Steve’s also famous for hand-holding and moving his ND-Grad filters during the exposure so that each image is unique and one of a kind.

As Steve teaches, getting control of the colors and the light “in-camera” using a graduated neutral density is a great way to practice your craft in the field. Learning to properly use a few simple filters can extend your success and bring some much needed control to your landscape photography.

Workshop Preparation – Use a Ball Head

When you buy a good quality tripod, you get just the tripod legs (even though it’s called a tripod). A good quality ballhead can make all the difference in capturing great looking landscape or nature images. A ballhead will let you quickly and easily adjust where your camera is pointed and how it is oriented (horizontal or vertical). Its also the most secure means to hold that expensive DSLR and lens you’ve just paid good money for.

rrs_bh40_blog

The folks at Really Right Stuff make the best ballheads and arca-swiss style clamps I’ve ever used and the unit shown above is their BH-40 LR (BH-40 head with B2-40 LR clamp). It fits perfectly on my Gitzo tripod legs and keeps my Canon 5D Mark II secure and stable when taking landscape shots. It’s a great ballhead for basic pano shots as well.

Sunset at Lighthouse Peak

Canon G10 Landscape RigI wrote a post last November about how to outfit your Canon PowerShot “G” series cameras for landscape and nature photography and I thought it might be time to update it a bit before the holiday season.

I love the resolution and detail the Canon 5D Mark II is capable of producing and for most of my commercial and landscape work it’s my camera of choice. However, like all other DSLRs the 5D2 can seem like quite a load to lug around during a serious day-hike or weekend backpack trip to the mountains of west Texas. I generally hesitate to leave my 5D2 and lens kit behind on the off chance that I’ll stumble upon a once in a lifetime photographic opportunity and won’t have by best gear along to capture it.

With the Canon Powershot “G” series cameras this fear can finally be put to bed. The resolution, sharpness and lack of barrel or pin-cushion distortion offered by the G10/G11/G12 cameras make them ideal for landscape work when used with the Lensmate filter adapter shown above. Add a custom designed aluminum L-Plate from Really Right Stuff to the “G” series outstanding materials of construction and you’ve got a sturdy but lightweight rig that any landscape photographer would be proud to carry.

With results like this, taken from the Lighthouse Peak mesa in Palo Duro Canyon State Park, it’s hard to justify carrying around the extra weight of a full-size DSLR when hiking.

Sunset at Lighthouse Peak

Sunset at Lighthouse Peak – Palo Duro Canyon, Texas
Copyright © 2010 Jeff Lynch Photography
Shot taken with a Canon Powershot G10 set on aperture priority (Av) using a circular polarizer. The exposure was taken at 28mm, f/6.3 for 1/50th of a second at ISO 80. All post capture processing was done in Adobe’s Lightroom 3. Click on the image above for a larger version.

Click on the image above for a larger version.

View Location on Panoramio & Google Earth: Sunset at Lighthouse Peak – Palo Duro Canyon, Texas

You Really Do Need a Good Tripod

I rant and rave about the pitfalls of gear lust in our industry and how this expensive little vice can ruin a photographer’s creative spirit. Folks that hear me speak or attend my workshops get the same worn out lecture over and over (just ask Glenn).

However, to be a successful landscape photographer you really do have to invest in a sturdy but light-weight carbon-fiber tripod and a good quality ball head & clamp. This is the one area where you just can’t “go cheap” and get by on something less. And folks, this is going to set you back over $750. (Sorry Lesley, I just had to write this!)

I strongly urge you to buy a Gitzo carbon-fiber tripod and a Really Right Stuff ball head & clamp. Or if you’re feeling very generous, look at one of RRS’s brand new carbon-fiber tripods made in the USA. Either Gitzo or RRS gear will last a lifetime (or longer) and your back will thank you on every hike you make to capture those great landscape shots.

Getting a shot as sharp as the image below takes a rock-steady tripod. Hiking the miles it takes to find this type of location takes a strong back and a lot of stamina. Try lugging around a ten pound tripod and see how many of these shots you miss from sheer exhaustion. Do yourself and your craft a favor. Get yourself a carbon-fiber tripod!

By way of a disclaimer for the FTC, I have a very good relationship with both Gitzo and Really Right Stuff. I pay them for their fine products and they happily accept my money just as they do for thousands of other photographers. 😉

Dusk on the Pedernales

Dusk on the Pedernales – Johnson City, Texas
Copyright © 2010 Jeff Lynch Photography
Shot taken with a Canon EOS 5D Mark II set on aperture priority (Av) using an EF 17-40mm f/4L USM lens tripod-mounted. The exposure was taken at 20mm, f/16 for 0.8 seconds at ISO 200 using a Singh-Ray LB warming polarizer filter. All post capture processing was done in Adobe’s Lightroom 3 Beta 2. Click on the image above for a larger version.

Texas Landscape Safari Preparation – Ball Heads

Sandy Creek

Sandy Creek – Llano, Texas
Copyright © 2010 Jeff Lynch Photography
Shot taken with a Canon EOS 5D Mark II set on aperture priority (Av) using an EF 24-104mm f/4L IS USM lens tripod-mounted. The exposure was taken at 95mm, f/9 for 1/500th of a second at ISO 100 using a Singh-Ray warming polarizer. All post capture processing was done in Adobe’s Lightroom 3 Beta 2. Click on the image above for a larger version.

One thing I forgot to mention in my last post is that most high quality tripods are sold “bare”, without anything to attach them to your camera. This is where the ball head and clamp come in. Good quality ball heads are designed to support heavy loads, move smoothly and lock solidly. Ball heads are easier to use and much more stable than the old fashioned “pan & tilt” tripod heads. Aiming and leveling can be accomplished as one motion, and solid lockup is accomplished with a tightening of only one control.

The best designed ball heads also offer variable tension that makes them easy to control. Tripods with ball heads are much easier to pack and carry than pan & tilt heads since they have no long handles to get in the way.

Ball_Head_Blog

But the ball head is only half the story. The other half is the clamp system which is used to attach your camera to the ball head. Mounting your camera using the standard ¼”‑20 screw is far too slow and insecure. Instead, many manufacturers adopted the “Arca-Swiss” standard which uses an open-ended dovetail channel with compressing side jaws that grip the mounting plate or bracket attached to the camera. This unique setup provides a quick and easy clamping system that is very solid and secure.

When used in conjunction with an L-Plate designed for your specific camera the quick-release clamp system allows the landscape photographer to quickly switch between shooting horizontally and vertically as shown in the images below.

Quick Release Clamp & Camera L-Plate

Quick Release Clamp with L-Plate

Really Right Stuff
In my opinion the best design and highest quality ball heads, clamps and camera plates are made by Really Right Stuff, a great little company in California owned and operated by Joe Johnson. The folks at RRS are incredible to work with and their attention to detail in the design and manufacturing of camera support systems is second to none. That’s why you’ll see nine out of ten professionals using RRS gear including guys like Joe McNally, Moose Peterson, Scott Kelby and Kirk Tuck.

The advice I give to most serious amateurs is to buy the best tripod and ball head you can possibly afford and buy them only once. Really Right Stuff gear is expensive but worth every penny. The workmanship is something I’ve only seen in medical devices before and the various parts fit together perfectly, time after time.

I’ve put an RRS L-Plate on every camera I currently shoot with from my 5D mark II to my G10 and can lock them into my BH-30 LR / Gitzo Traveller in just seconds to capture that perfect light at the end of the day. I honestly can’t imagine using any other brand than Really Right Stuff.

Workshop Preparation – Camera Support Systems

Jeff,
What ballhead is in that photo? (or is that for tomorrow’s post?)
Thanks.
Andy

If you’ve read my previous post, then you understand that high quality tripods are sold “bare”, without anyhting to attach them to your camera. This is where the ballhead and clamp come in. Good quality ballheads are designed to support heavy loads, move smoothly but lock solidly. Ballheads are easier to use and much more stable than the old fashioned “pan & tilt” tripod heads. Aiming and leveling can be accomplished as one motion, and solid lockup is accomplished with a tightening of only one control. The best designed ballheads also offer variable tension that makes them easy to control. Tripods with ballheads are much easier to pack and carry than pan & tilt heads since they have no long handles to get in the way.

Ball_Head_Blog

But the ballhead is only half the story. The other half is the clamp system which is used to attach your camera to the ballhead. Mounting your camera using the standard ¼”‑20 screw is far too slow and insecure. Instead, many manufacturers adopted the “Arca-Swiss” standard which uses an open-ended dovetail channel with compressing side jaws that grip the mounting plate or bracket attached to the camera. This unique setup provides a quick and easy clamping system that is very solid and secure.

When used in conjunction with an L-Plate designed for your specific camera the quick-release clamp system allows the landscape photographer to quickly switch between shooting horizontally and vertically as shown in the images below.

Quick Release Clamp & Camera L-Plate

Quick Release Clamp with L-Plate

Really Right Stuff
In my opinion the best design and highest quality ballheads, clamps and camera plates are made by Really Right Stuff, a great little company in California owned and operated by Joe Johnson. The folks at RRS are incredible to work with and their attention to detail in the design and manufacturing of camera support systems is second to none. That’s why you’ll see nine out of ten professionals using RRS gear including guys like Joe McNally, Moose Peterson and Scott Kelby.

The advice I give to any serious amateur is to buy the best tripod and ballhead you can possibly afford and buy them only once.  Really Right Stuff (gotta love that name) gear is expensive folks but worth every single penny. The workmanship is something I’ve only seen in medical devices before and the various parts fit together perfectly, time after time.

I’ve put an RRS L-Plate on every camera I currently shoot with from my 5D mark II to my G10 and can lock them into my BH-40 LR / Gitzo Traveller in just seconds to capture that perfect light at the end of the day. I honestly can’t imagine using any other brand than Really Right Stuff.